26.4 New Siterra Preview Notes
These notes describe what we've added to the new Siterra preview in this release. Review the Siterra Release Notes for other changes to the product in this release.
We're delivering this automatic upgrade to UAT environments on July 16, 2026 and to production environments on August 8, 2026.
These notes are subject to change until the production release.
Improved session expiry management
SP-59508
When a session expires due to inactivity in New Siterra, the classic Siterra sign in page now displays, so you can sign in again and resume your work. This ensures consistency between classic Siterra and new Siterra.
Switch views in the To-Do page
SP-58771, SP-59179, SP-59180
Select a View in the To do section of the To-Dos page to apply a saved view to the table. This refreshes the table with the columns and layout defined in that view, to help you work more efficiently.
In the View option, Default always appears first. Your saved views are listed alphabetically below it. If available, Create view appears as the last option, so you can create a new view directly from the View option.
 Limitation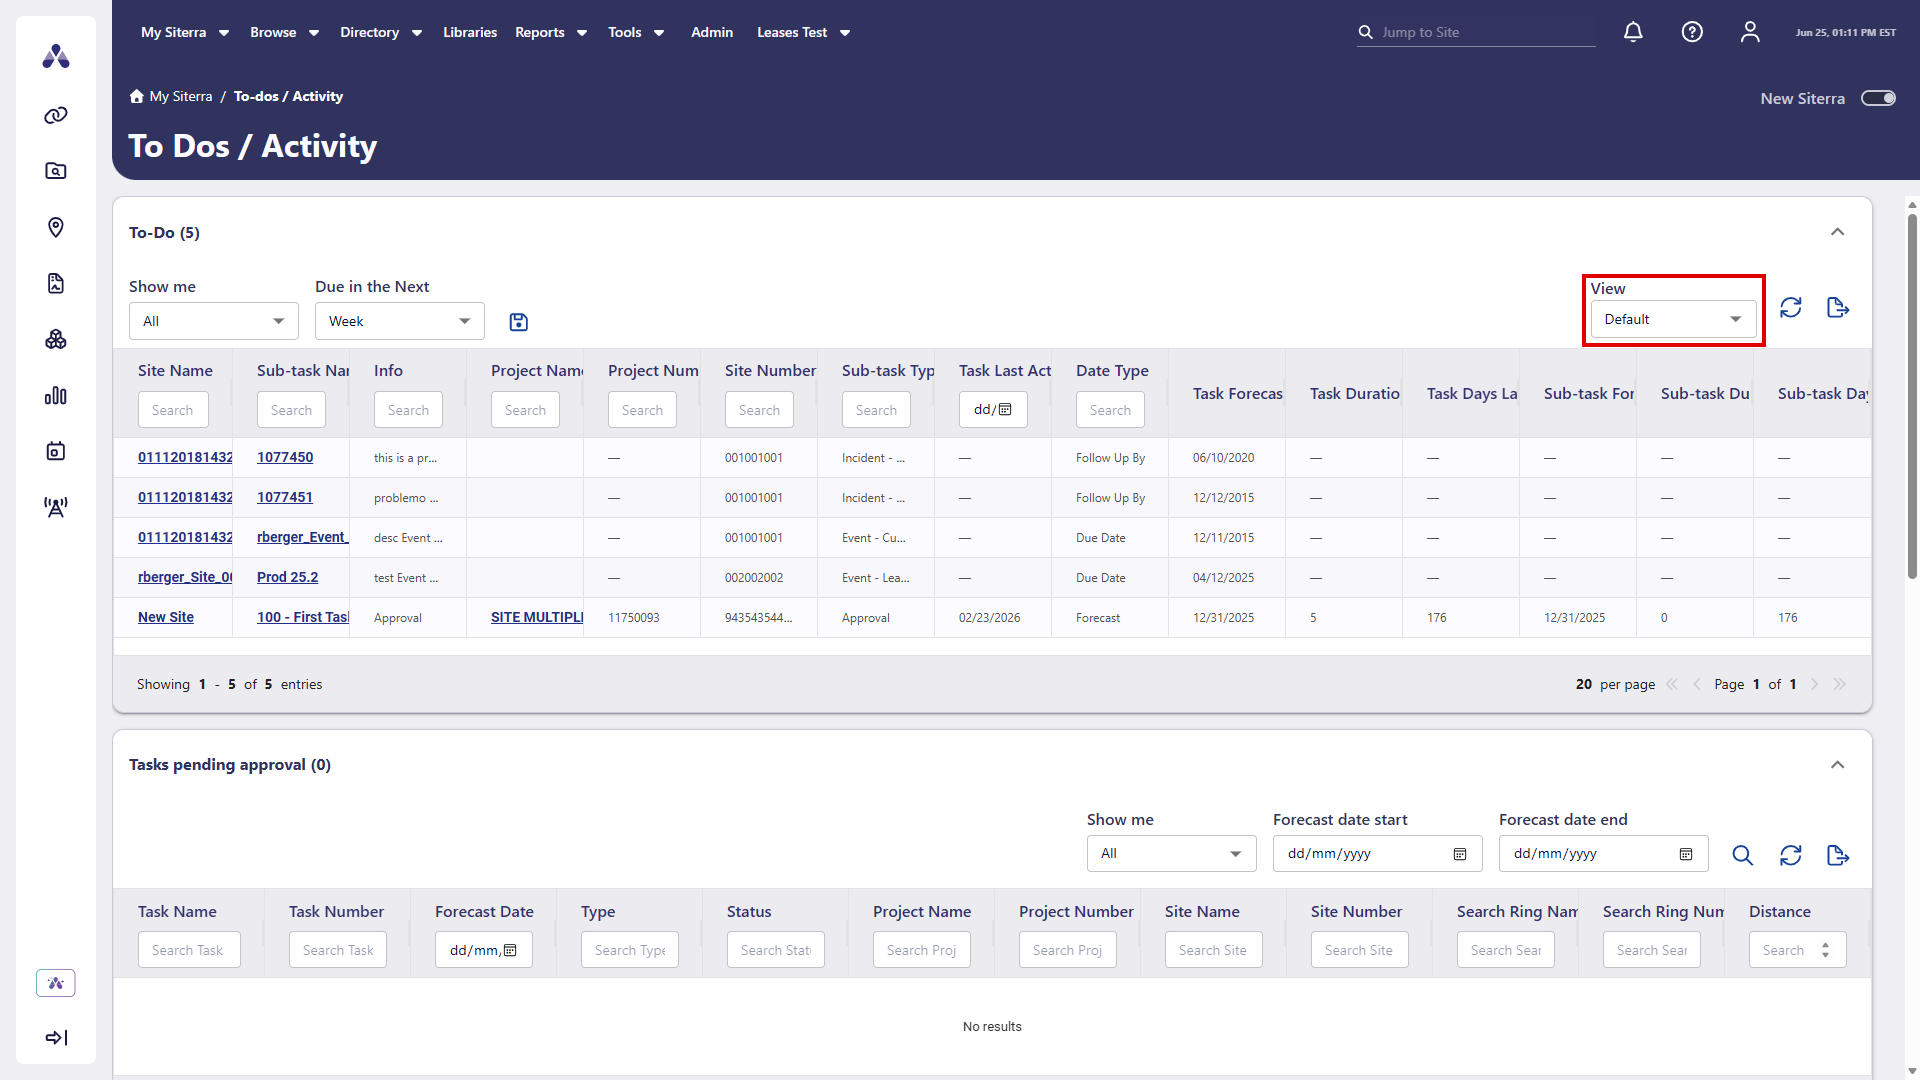
The view you select remains active until you choose a different one. If a saved view is no longer available, the table automatically displays the Default view.
In the View option, select Create view to configure and save a new view. After you save the view, the dialog closes and the table refreshes automatically to display the new view. The new view then appears in the View option in alphabetical order below Default.
Search
SP-59050, SP-59051, SP-59055
Find what you need quickly using the modernized search experience in new Siterra. Search across your environment for specific entities and refine results with flexible filters.
Standard search
Use a standard search to return a list of results that most closely match your search term.
-
Select the magnifier icon
 in the Search box in the upper-right corner of the screen.
 -
Select Search For, then select the type of object you want to search for, including:
-
Site
-
Search Ring
-
Project
-
Incident
-
Event
-
Asset
-
Documents
-
Leases
-
Hub
-
Antenna
-
-
Enter your search term in the For field, then press Enter.
-
To narrow results, select an organizational unit in the From field. The From field displays a navigable hierarchy of organizational containers, so you can scope your search to a specific part of your environment.
-
Select Search to display the results.
In Search Results, select a column header to sort results in ascending or descending order.
Open an object's home page with Jump to
Use Jump to to go directly to the home page of an object in classic Siterra that matches your search term.
-
In the search bar, select the magnifier icon
. -
Under Jump to, select the object type.
-
Enter the exact object name or number, then press Enter.
If a match is found, Siterra opens the home page of that object. If there are no exact matches, a list of closely related results appears.
Advanced search
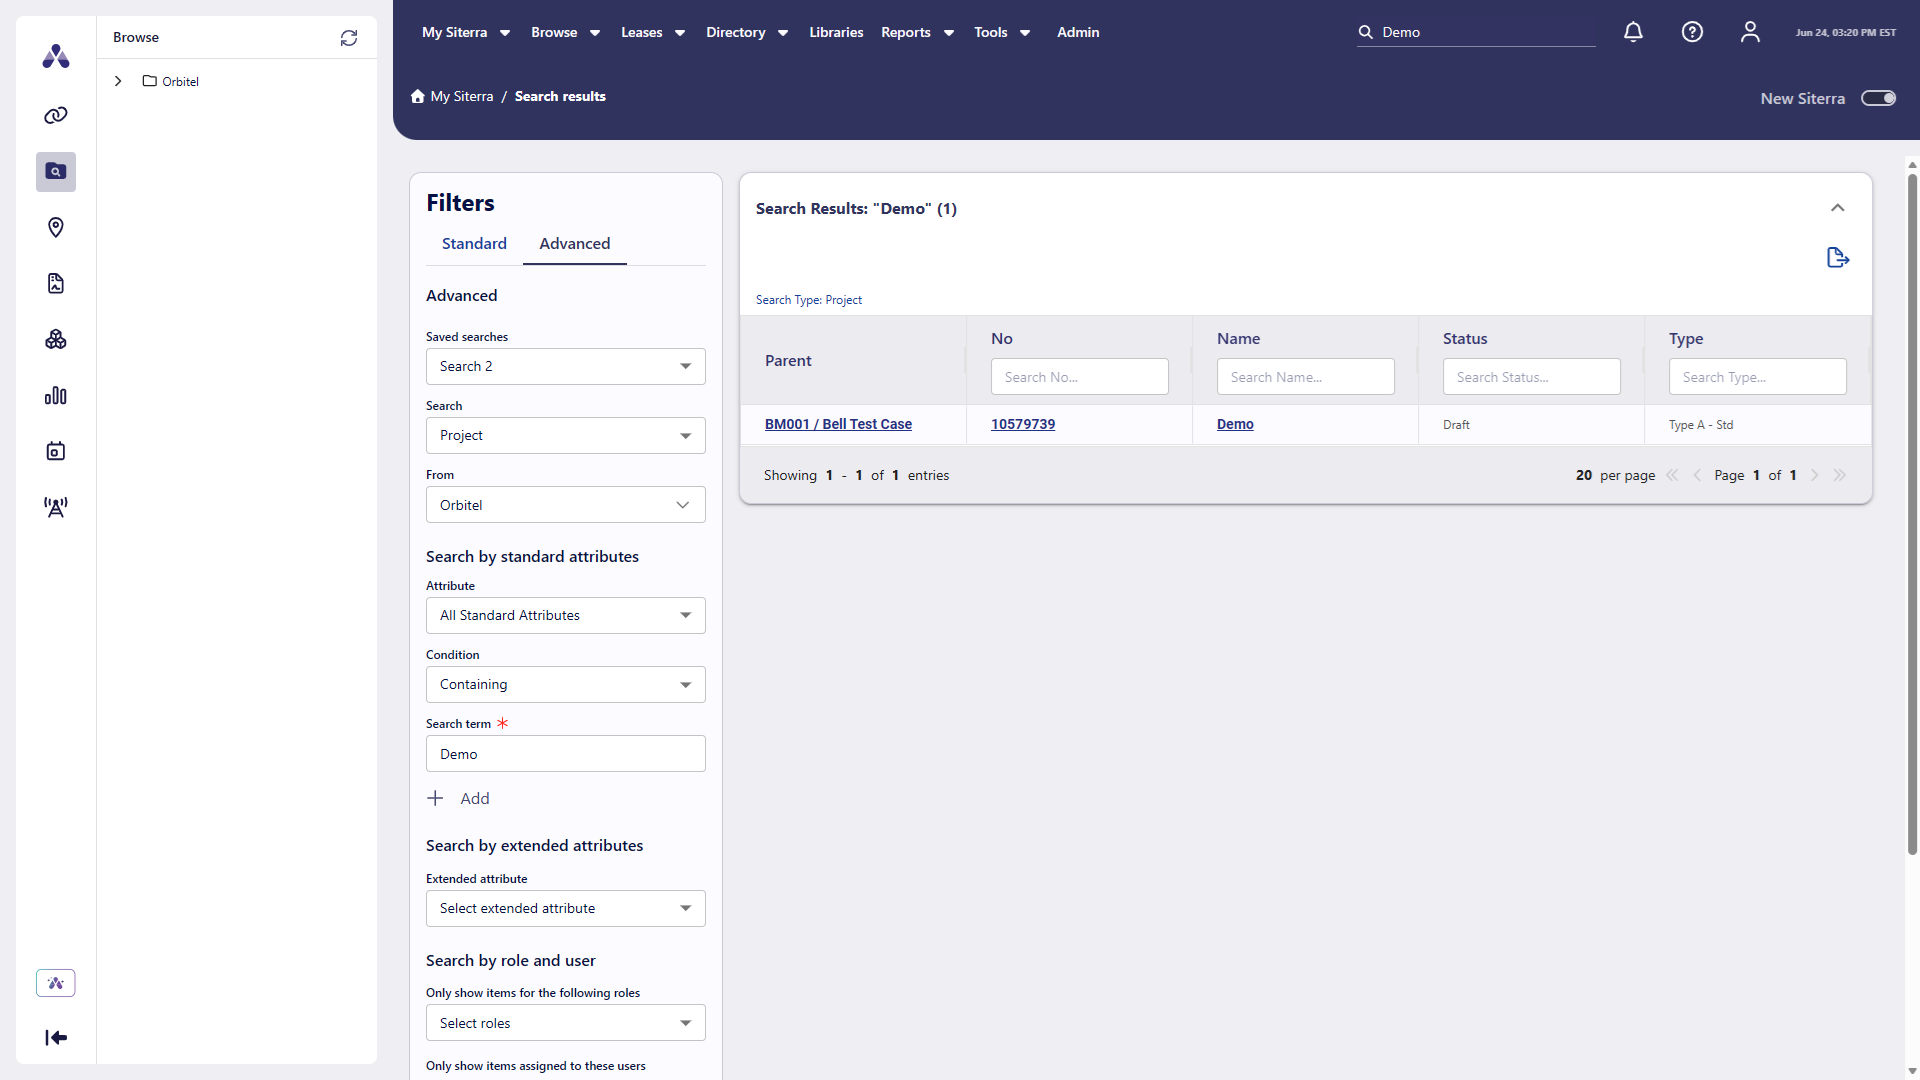
Use Advanced Search to select specific attributes to narrow your search results. Select multiple attributes to narrow the search results even further.
Search using:
-
Standard attributes.
-
A phrase or one or more values in a lookup table.
-
Extended attributes.
-
Conduct a standard search, then select the Advanced tab.
-
Enter search criteria:
-
Search: Object type to search.
-
From: Organization unit to search.
-
Standard Attributes: Select + to add an attribute criteria row. For each row, select the Attribute, select Containing or Not Containing, then enter a search term. Add multiple rows to combine criteria. Remove a single row or select Remove all to clear all rows.
-
Search by extended attributes: Select the Extended attribute. When you select an extended attribute, additional options display, including Form and section, On, and Attribute, so you can refine the search criteria.
-
Search by Role and User: Enter role assignments and user assignments to narrow the search.
-
Sort By Relevance: List results based on the order of relevance.
-
-
Select Search.
In Search Results, select a column header to sort results in ascending or descending order.
Save and reuse advanced searches
If you conduct the same advanced search often, save it for future use.
-
Select Save Search.
-
Enter a meaningful name to identify the search.
-
Select Save.
To reuse the search, select it in Saved searches. Select Clear all to clear the search.
Expand and collapse state persists across sessions
SP-59788
The expand and collapse state of sections in new Siterra now reflects the configuration set in classic Siterra. Your preferred layout is retained when you navigate between pages, switch between classic and new Siterra, and sign out and sign in again.
Site home page
SP-59803
Manage sites using the sections of the new Siterra Site home page:
-
Site data
-
Site address
-
Responsibilities
-
Projects Summary
-
Vendors
-
Inventory / Equipment
-
Leases
-
Lease Critical Dates / Options
-
Notes
Select the down arrow  to expand a section and up arrow
  to collapse it.
Select download  in the toolbar of a section to export items to Excel.
Select  in the toolbar of a section to add items.
Sites quick access sections
SP-59802, SP-59804
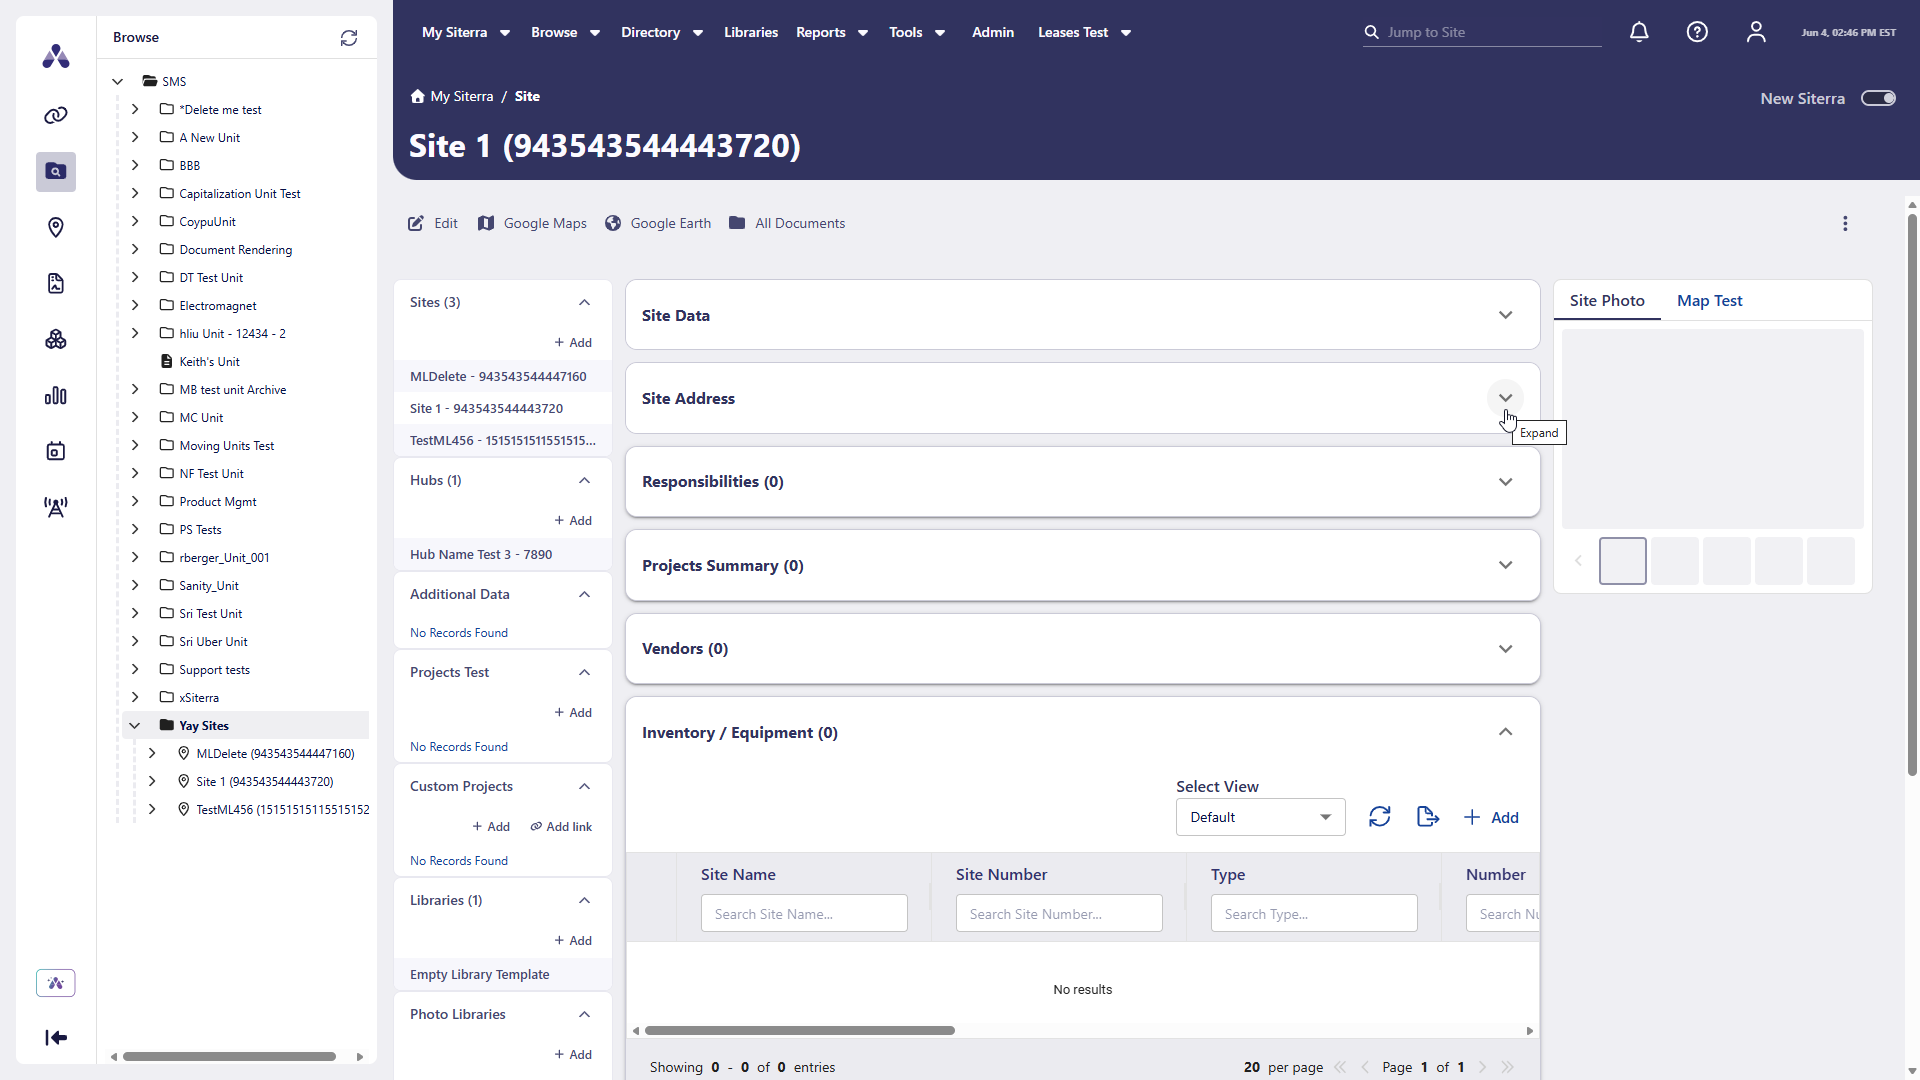
Use the sections in the sidebar to view and add related records directly from the Site home page including:
-
Sites: Access other sites in the parent search ring (or other unit)
-
Hubs: Manage hub objects associated with the site for portfolios with Small Cell functionality enabled.
-
Additional data: View and additional custom forms (not marked as default) associated with the site.
-
Projects: View and create projects associated with the site using templates.
-
Custom projects: View and create Ad hoc Projects associated with the site.
-
Libraries: View libraries associated with the site and add them.
-
Photo libraries: View and add visual resources associated with the site.
Expand and collapse sections to keep your workspace organized.
-
Select +Add to add a new item.
-
Select an item to view it.
Top menu actions
SP-59722
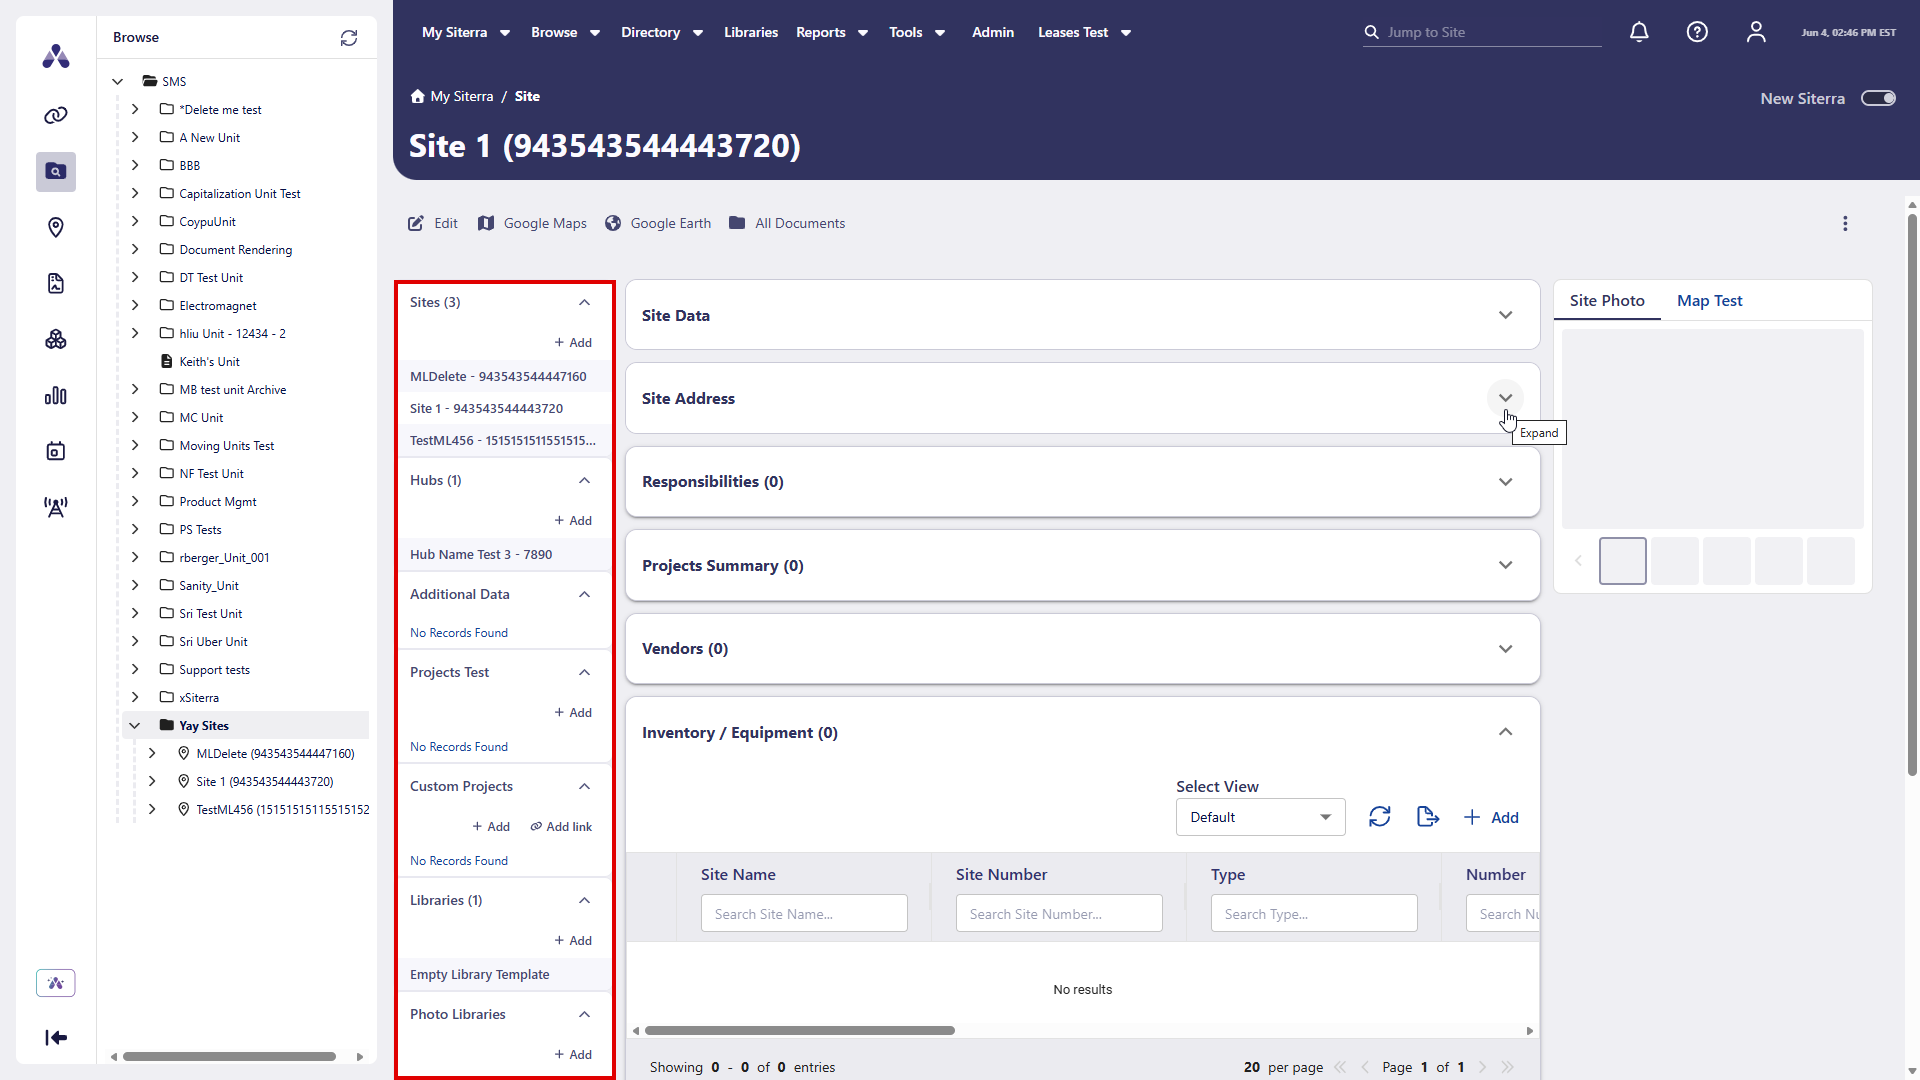
Use these options on the Sites page when available.
|
Icon / Option |
Function |
Available when |
|---|---|---|
|
|
|
|
|
|
Link site to parent site. Select the site, and then complete the link. |
|
|
|
Change parent site. |
|
|
|
|
|
|
|
View the site location in Google Maps. |
|
|
|
View the site location in Google Earth. |
|
|
|
All documents. View and search for all documents associated with the site. |
|
|
|
Select the ellipsis (
|
Actions display when you have permissions to use them. |


Ellipsis menu in sections
SP-59833, SP-95854, SP-59584, SP-59855
Select the ellipsis ( ) next to an item in a section to select an available action for that item.
|
Section |
Available actions |
|---|---|
|
Responsibilities |
|
|
Projects Summary |
|
|
Inventory / Equipment |
|
|
Leases |
|
|
Incidents |
|
|
Events |
|
|
Vendors |
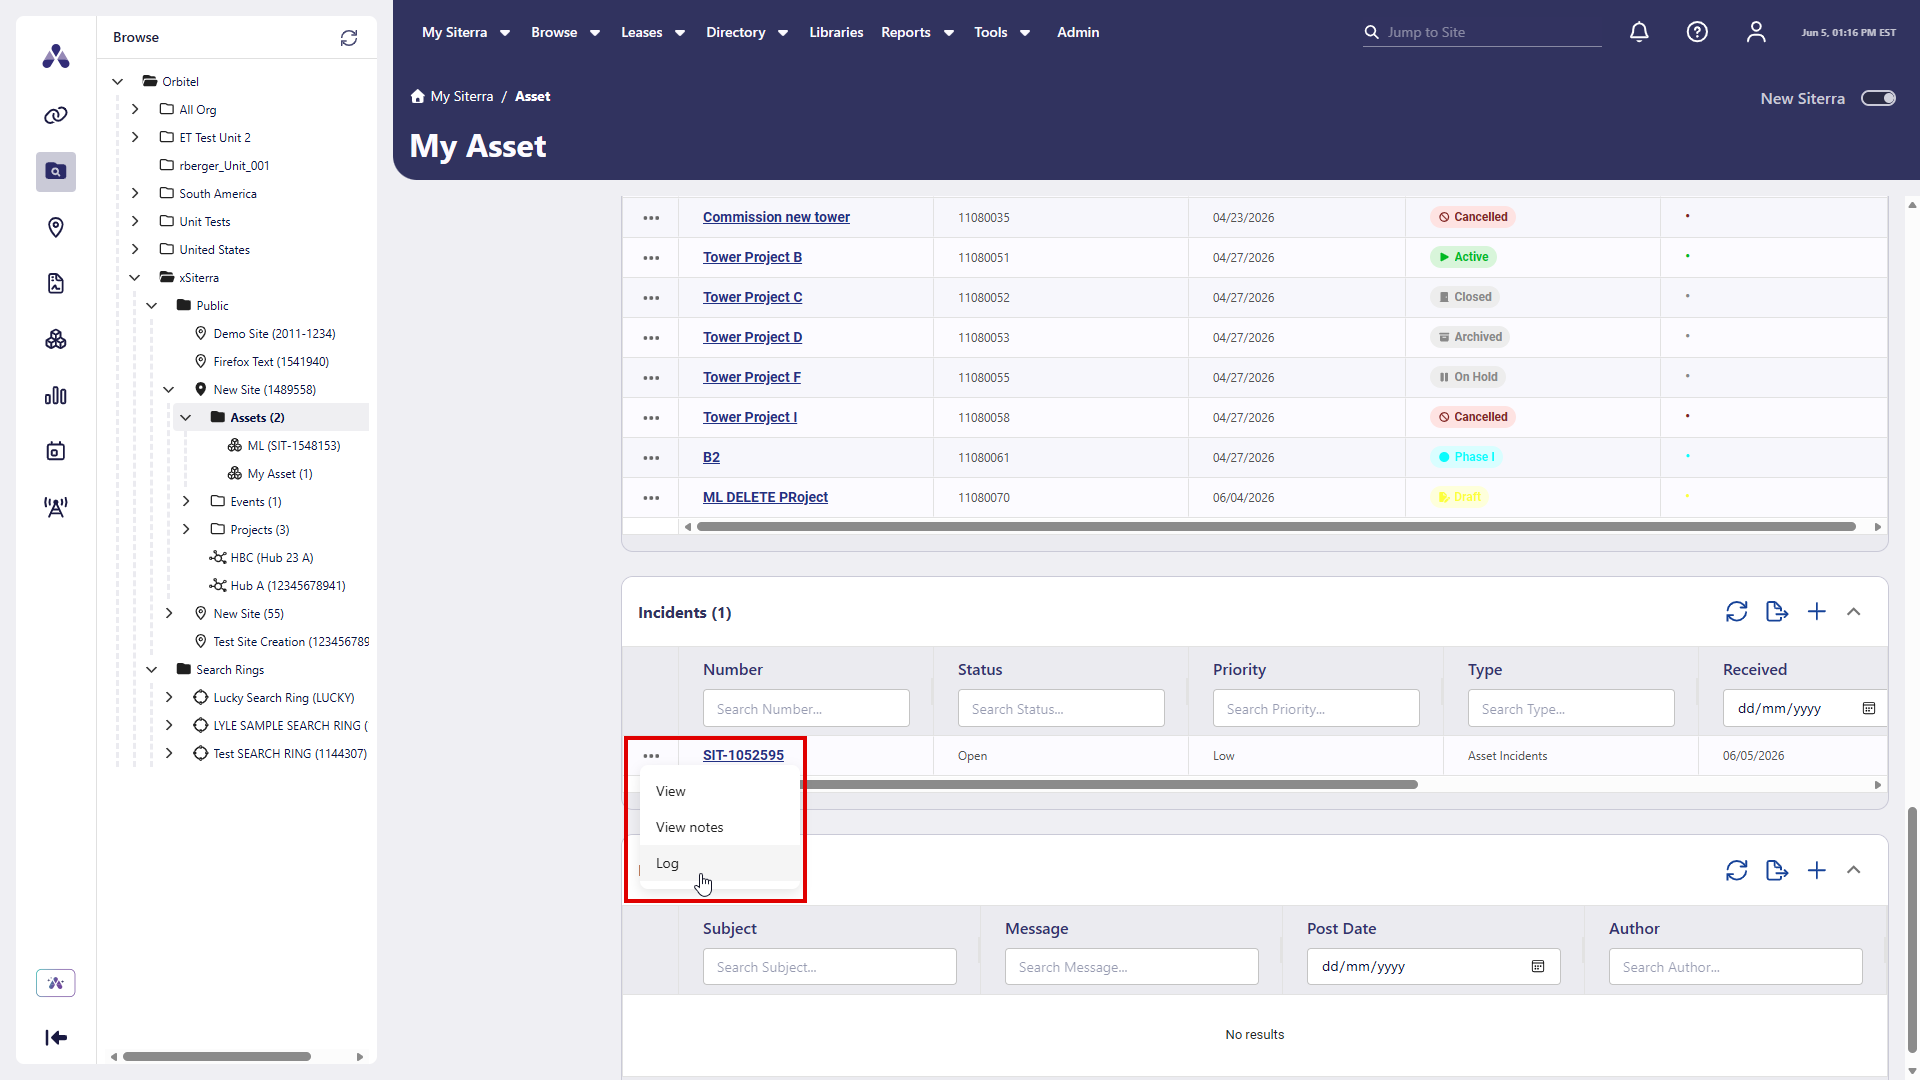
View component and incident logs
SP-59781
View component and incident logs using the ellipsis () next to an item in that section of the asset home page.
Incidents
SP-59754, SP-59753
View in incidents in new Siterra giving you a faster, more consistent experience for managing site incidents, including:
-
Site Details
-
Landlord Details
-
Incident Summary
-
PM Schedule Date
-
Contacts: View and add contacts.
-
Log
-
Notes: View and add notes.
Add assets
SP-59583
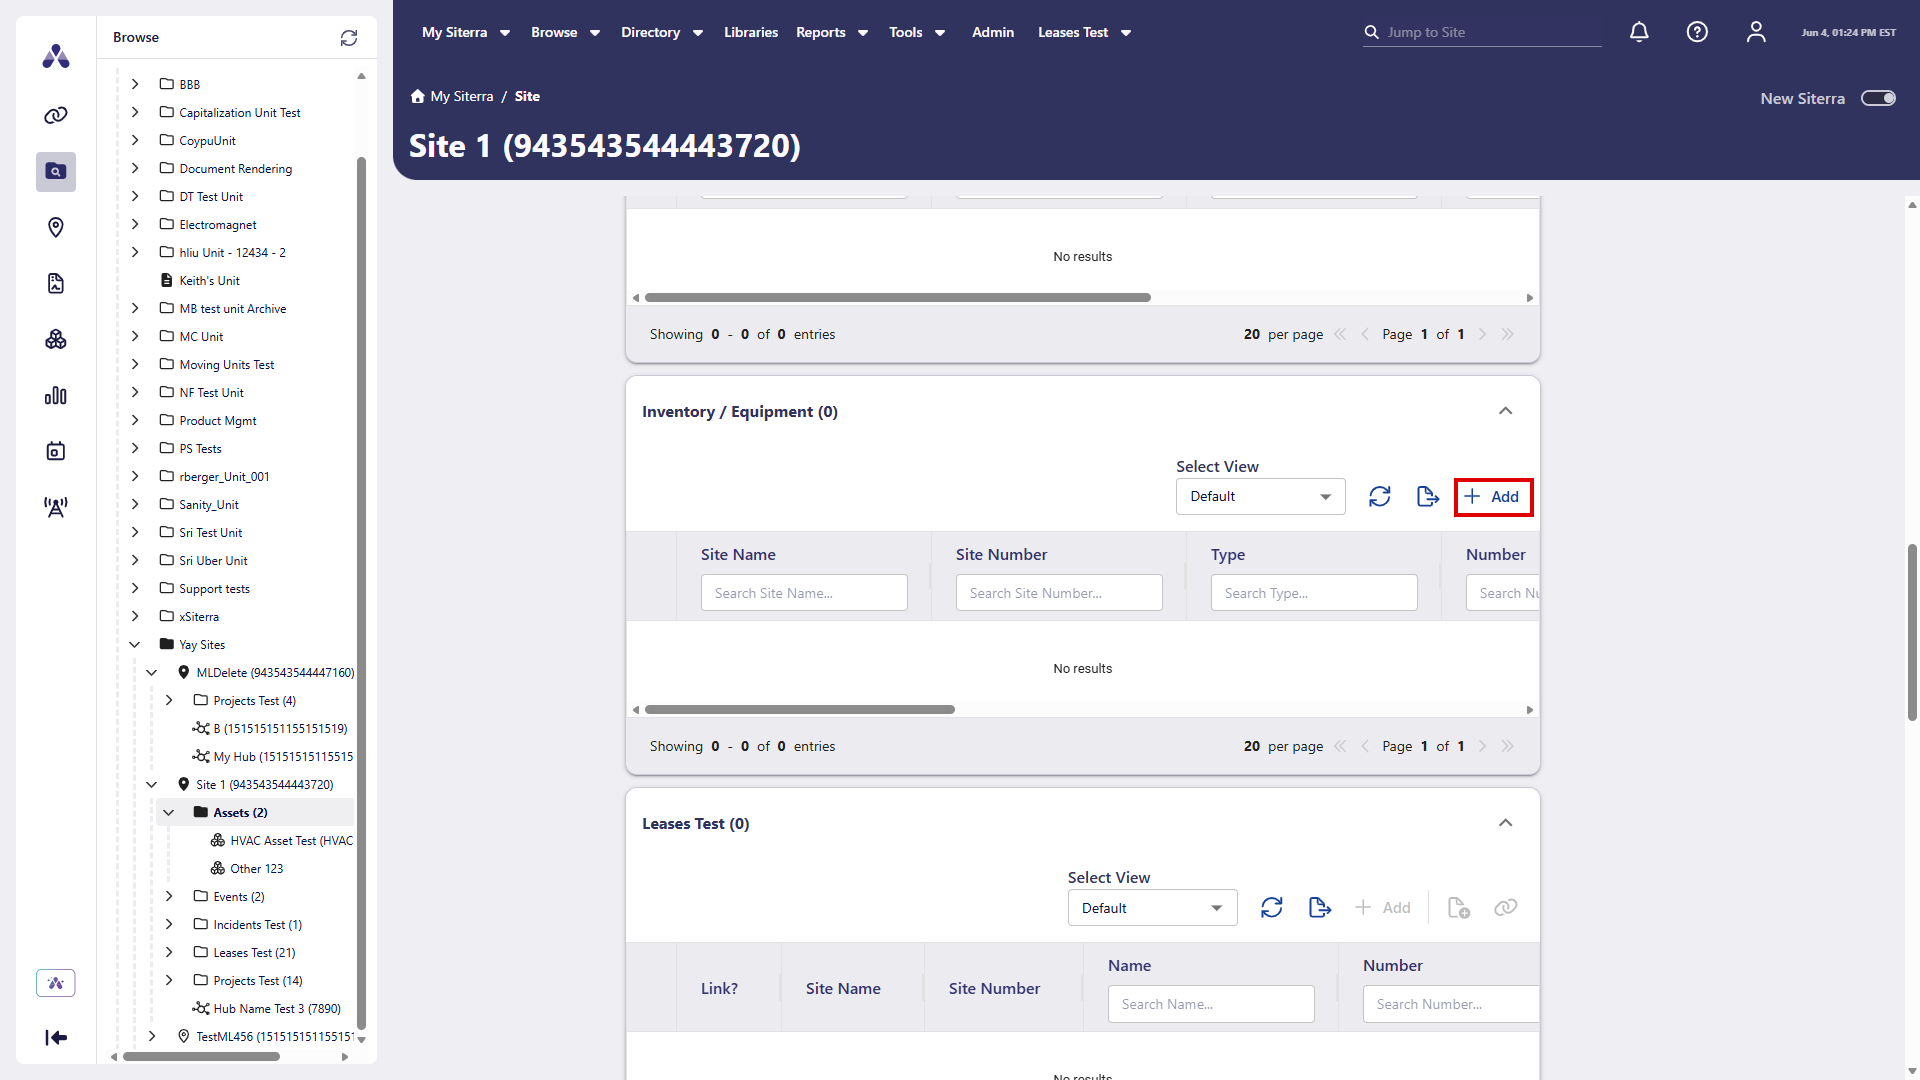
Create new assets directly from the Inventory and Equipment grid on the Site home page.
-
Select + Add in the Inventory / Equipment section of the site where you want to add an asset.
-
To populate values from the parent site:
-
Select Prepopulate parent info.
-
Review the parent site information that displays.
-
Select Apply parent info.
-
-
Complete each section of the Add Asset window:
Extended Attributes: Displays fields according to EA component types your administrator has configured such as Lookup and Calculated. When you change Asset Type, this refreshes automatically depending on the configuration your administrator has chosen.
-
Select Create.
Asset home page
Use new Siterra to carry to create and manage assets.
Top menu actions
SP-59975
Use these options on the Asset page when available.
|
Icon / Option |
Function |
|---|---|
|
|
Edit asset details. Opens the asset form in edit mode with existing data populated. |
Expand or collapse asset page sections and tiles with a single click
SP-59680, SP-59679
Select anywhere on a section header of the Asset page left container or card to expand or collapse that section or card. This is in addition to the down arrow and up arrow . The entire header area responds to your selection, making it faster and easier to navigate your asset details.
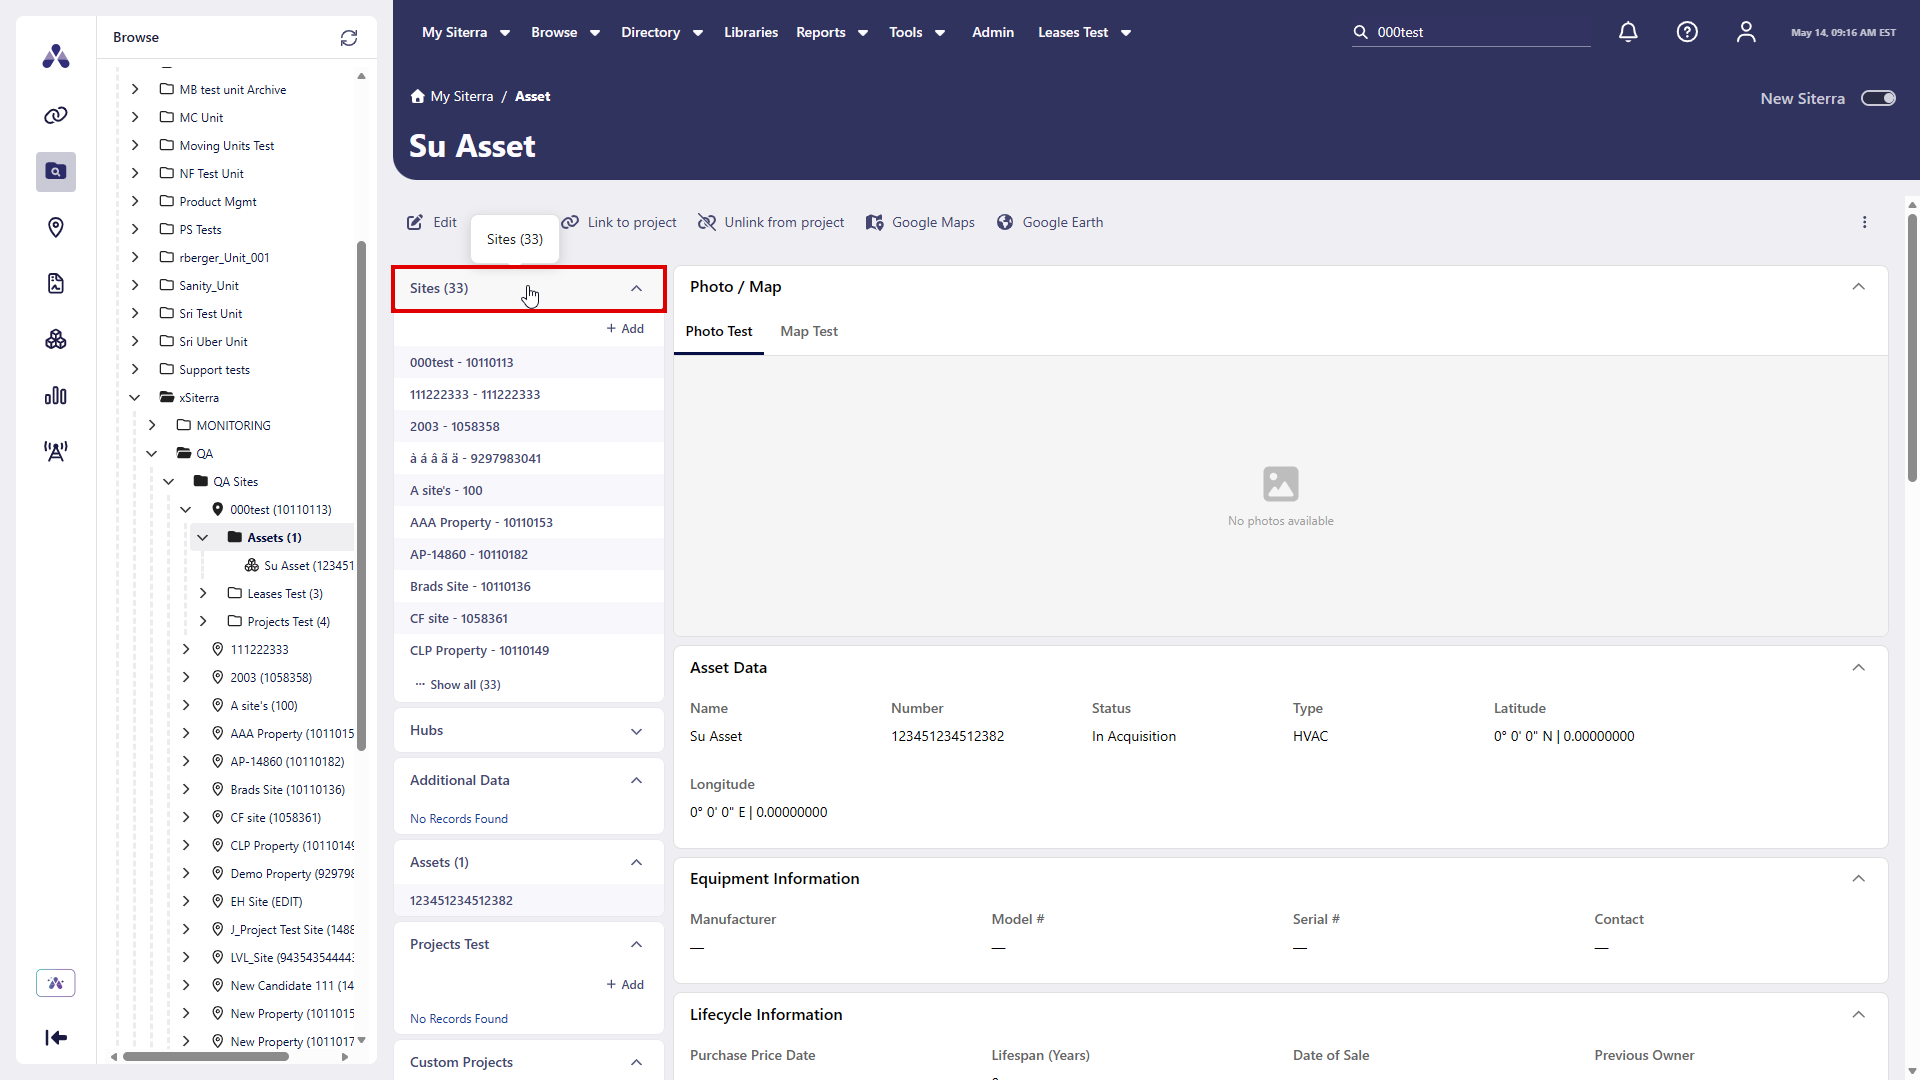
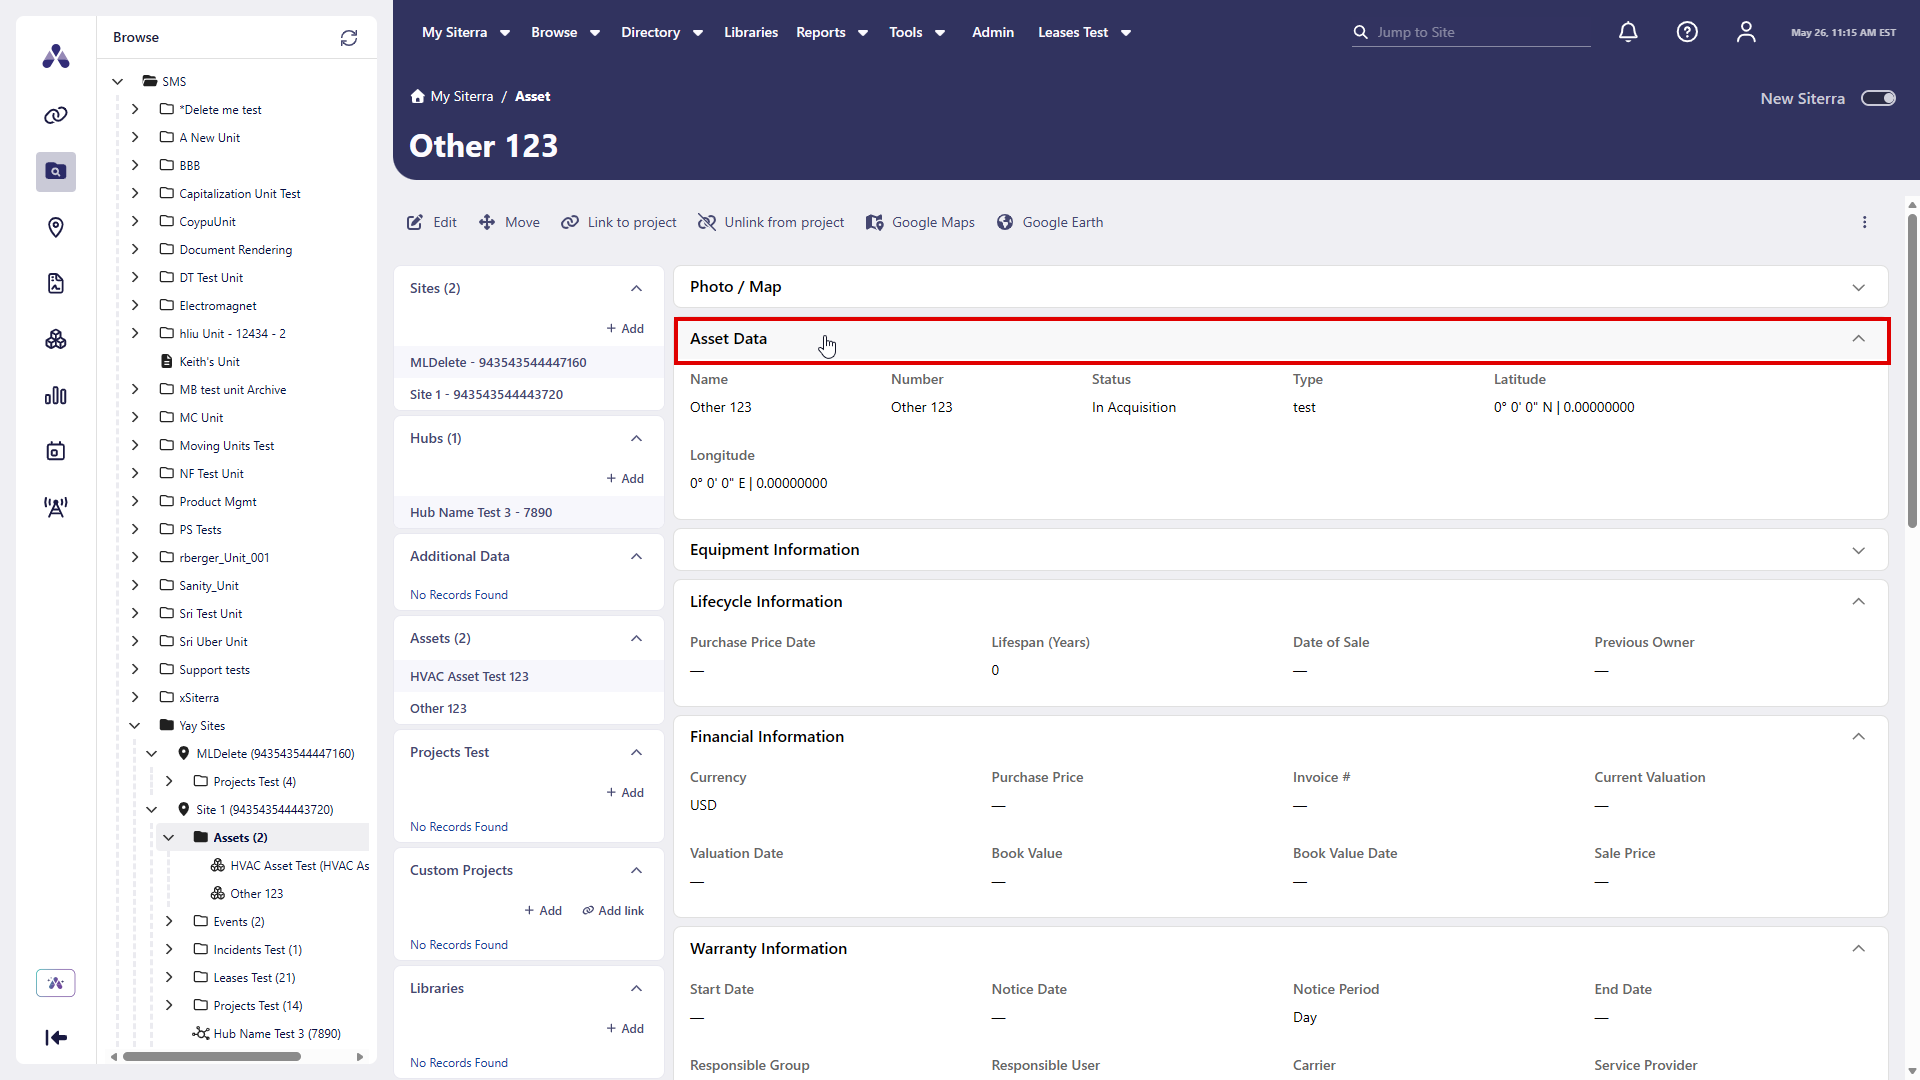
The title of each section shows the number of records in that section in parentheses. Select Show all to list all records in that section.
Select + Add to add a new record to that section.
Edit assets
SP-59677, SP-59975
Edit assets. Open any asset, select Edit, and update fields such as Type within a streamlined edit window. The edit form uses the same familiar layout and field validations as the Add Asset form.
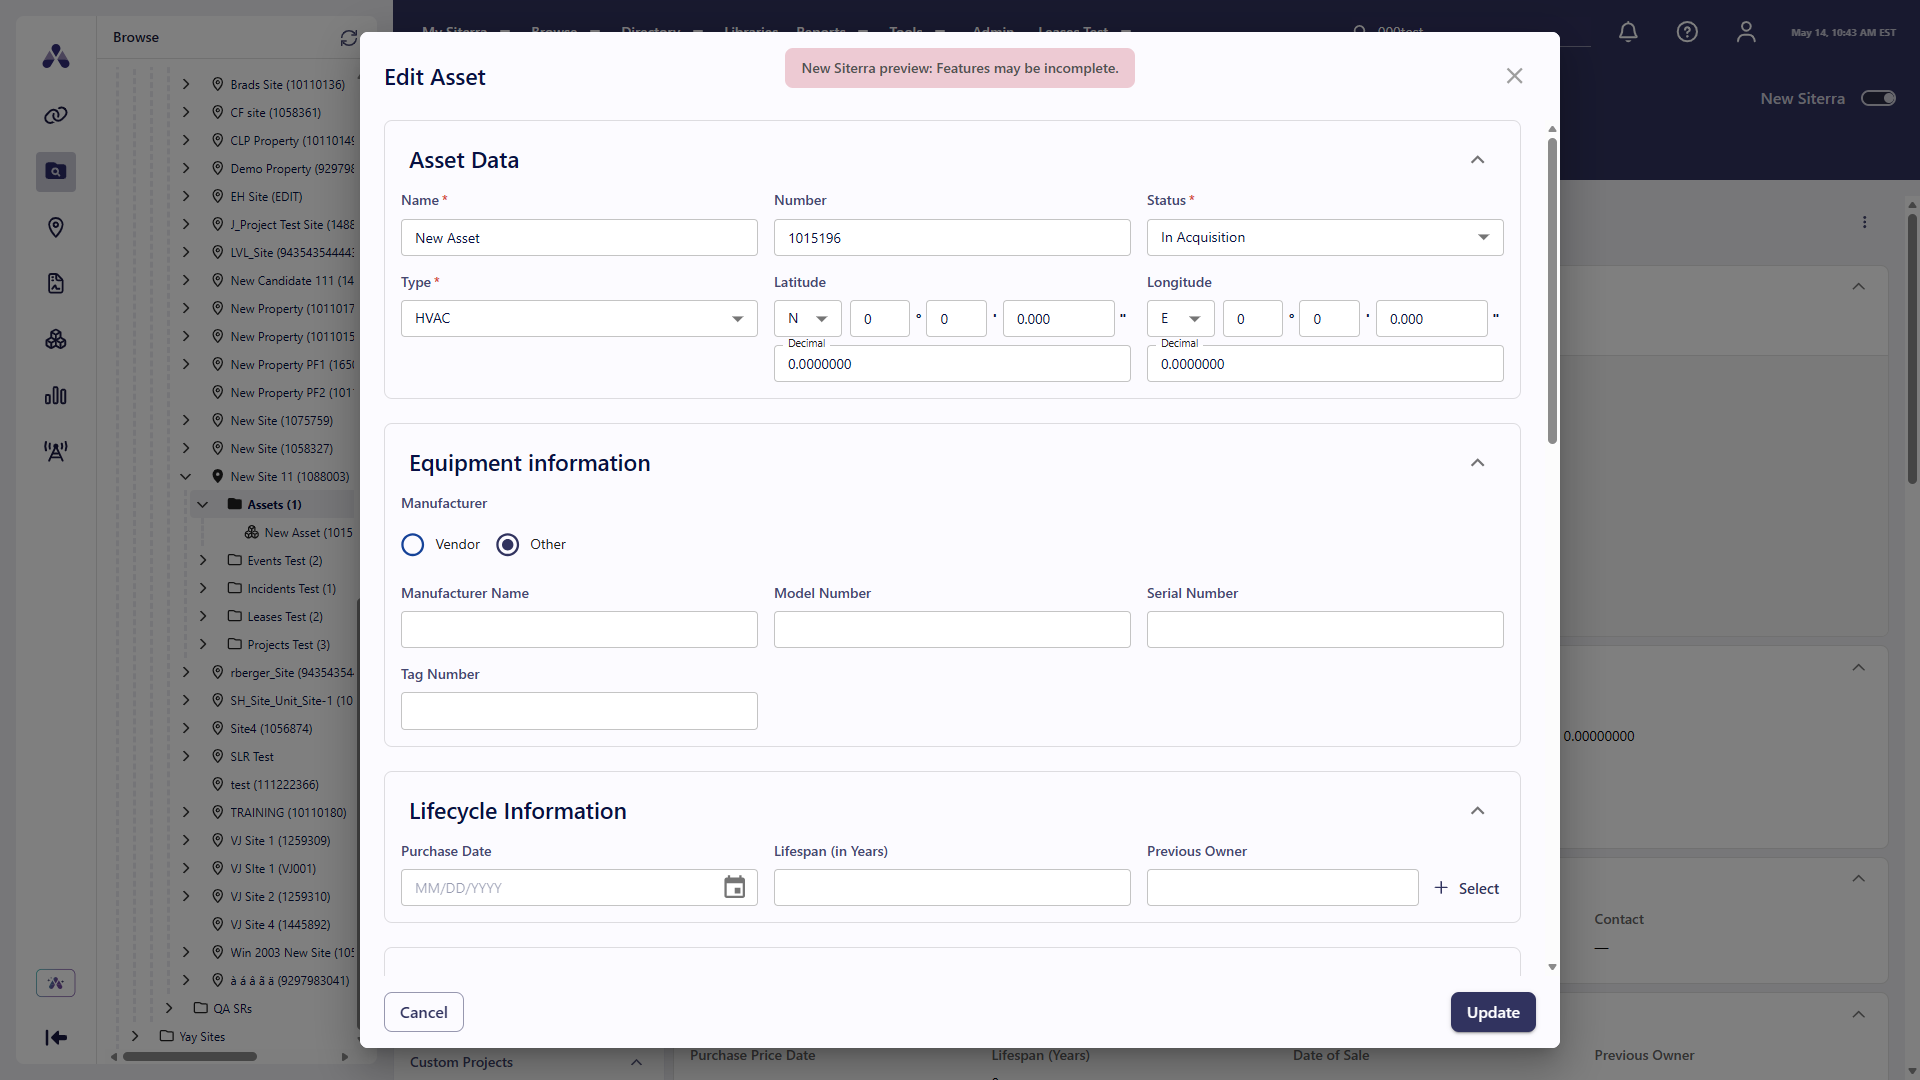
When you change an asset's type, the Extended Attributes section refreshes automatically to display the relevant fields for the newly selected type.
-
Navigate to an asset, or select Browse > Asset and select the asset you want to edit.
-
Select Edit.
-
Make your changes.
The edit form includes the same fields as the Add Asset form:
-
Select Update.
Extended Attributes: Displays fields according to EA component types your administrator has configured such as Lookup and Calculated. When you change Asset Type, this refreshes automatically depending on the configuration your administrator has chosen.
Changing the asset type updates the displayed fields. Saved data is retained but may not be visible for the selected asset type.
Select views in Projects Summary and Incidents sections
SP-59961
Select View in the Projects Summary and Incidents sections of the Asset page to apply a saved view to the table or create a new one. This refreshes the table with the columns and layout defined in that view, to help you work more efficiently. Select Edit View  to edit the selected view.
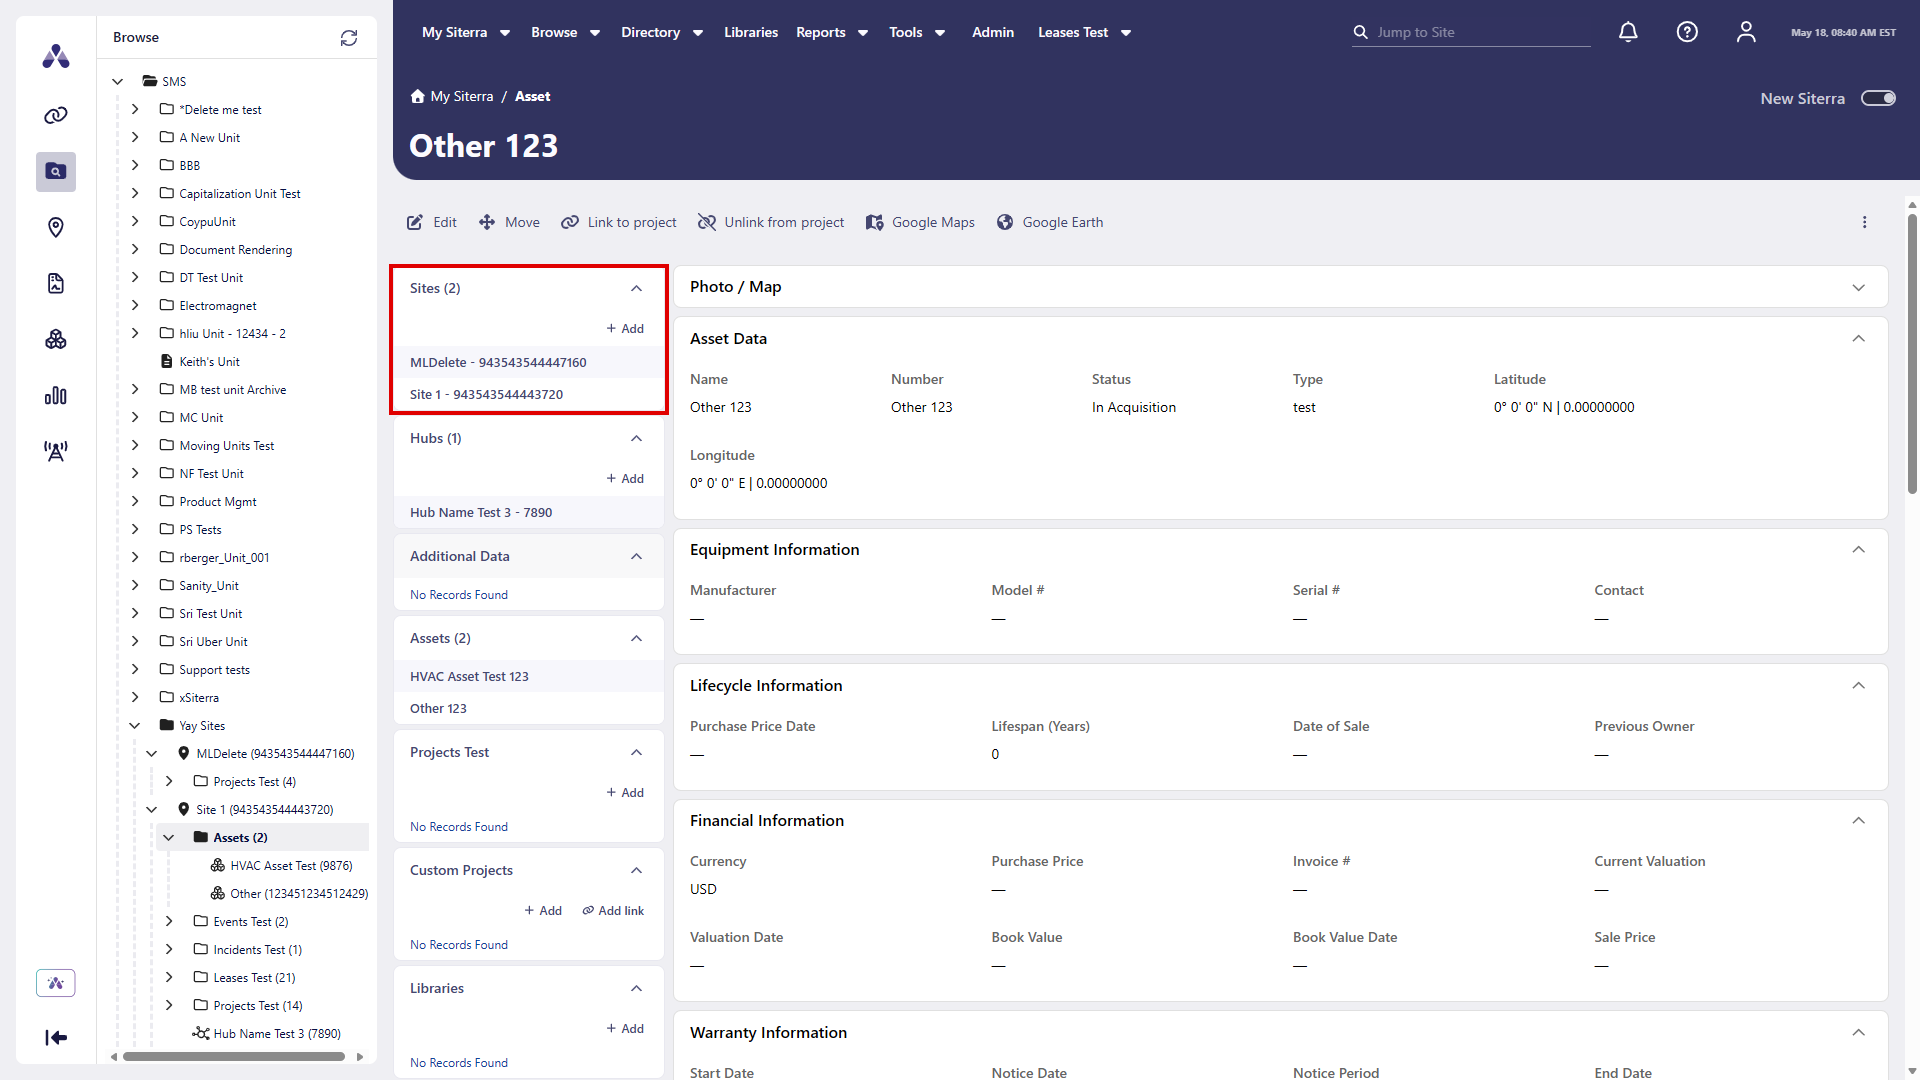
Asset quick access sections
SP-59022, SP-59023, SP-59024, SP-59017, SP-59025, SP-59026, SP-59018, SP-59027, SP-59019, SP-59028, SP-59020, SP-59029, SP-59021
Use the sections in the sidebar to view and add related records directly from the asset home page including:
-
Sites: View and add sites associated with the asset.
-
Hubs: Manage hub objects associated with the asset for portfolios with Small Cell functionality enabled.
-
Additional data: View and additional custom forms (not marked as default) associated with the asset.
-
Assets: View associated assets quickly.
-
Projects: View and create projects associated with the asset using templates. Hover over project status badge icons to display a tooltip showing that status.
-
Custom projects: View and create Ad hoc Projects associated with the asset. Reference external resources or Custom Projects directly. Add a link to an existing custom project. Hover over project status badge icons to display a tooltip showing that status.
-
Libraries: View and add libraries associated with the asset.
-
Photo libraries: View and add visual resources associated with the asset.
Expand and collapse sections to keep your workspace organized.
-
Select +Add to add a new item.
-
Select an item to view it.
Display forms on assets
SP-59684
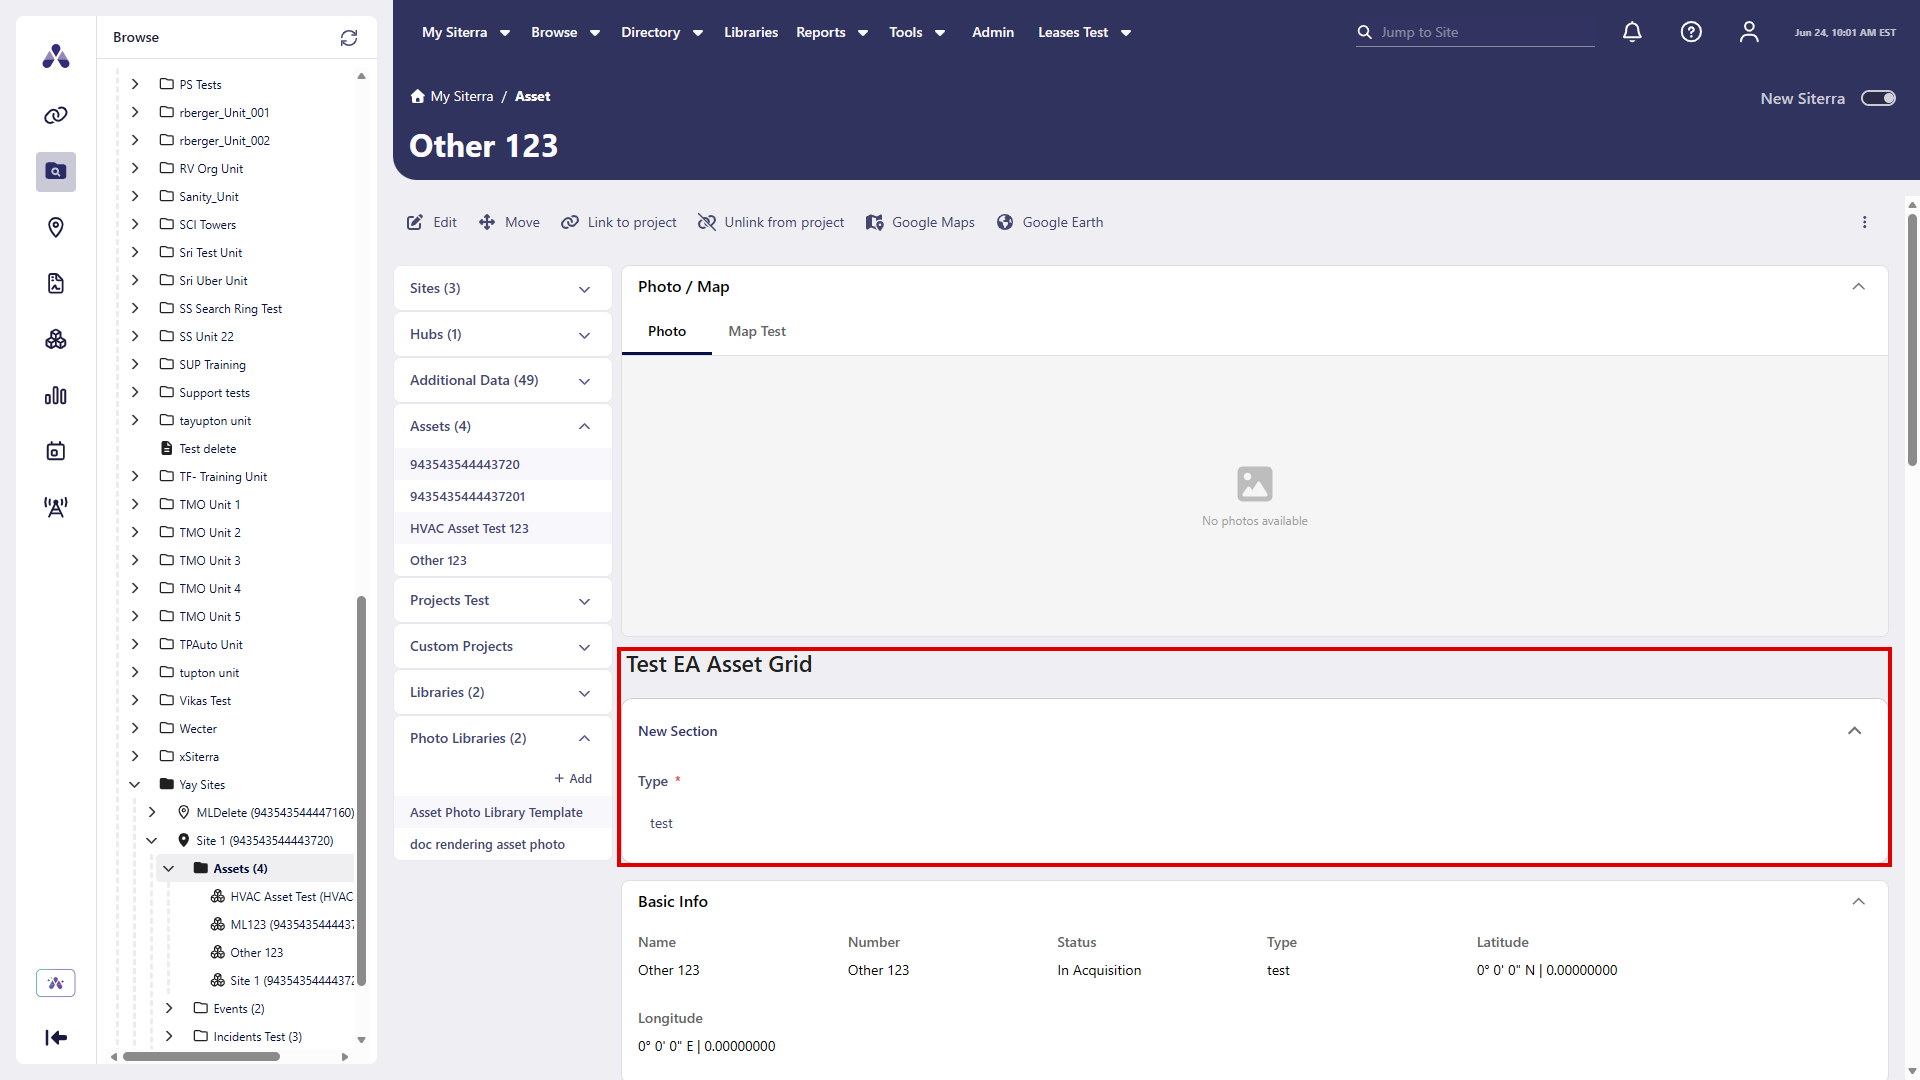
Display forms with extended attributes as cards and additional sections on the Asset home page.
The Asset page dynamically renders additional cards based on your Extended Attributes (EA) configuration.
-
Additional cards display below the Asset header card based on your EA configuration.
-
Each card represents a logical grouping of Extended Attributes with the section name as the card title.
-
Fields inside each card display EA labels and values.
-
If no Extended Attributes are configured for the project, no additional cards display.
Temporary Create Asset Option
SP-59823
We removed the temporary Create Asset option from the Asset page to ensure a consistent and streamlined workflow. Add assets in the standard way to manage your inventory.
Event home page
SP-59746, SP-59745, SP-59744, SP-59752
View the details of an event using the sections of the new Siterra Events home page:
-
Event Summary
-
Notes
Select the down arrow to expand a section and up arrow to collapse it.
Notes
SP-59748
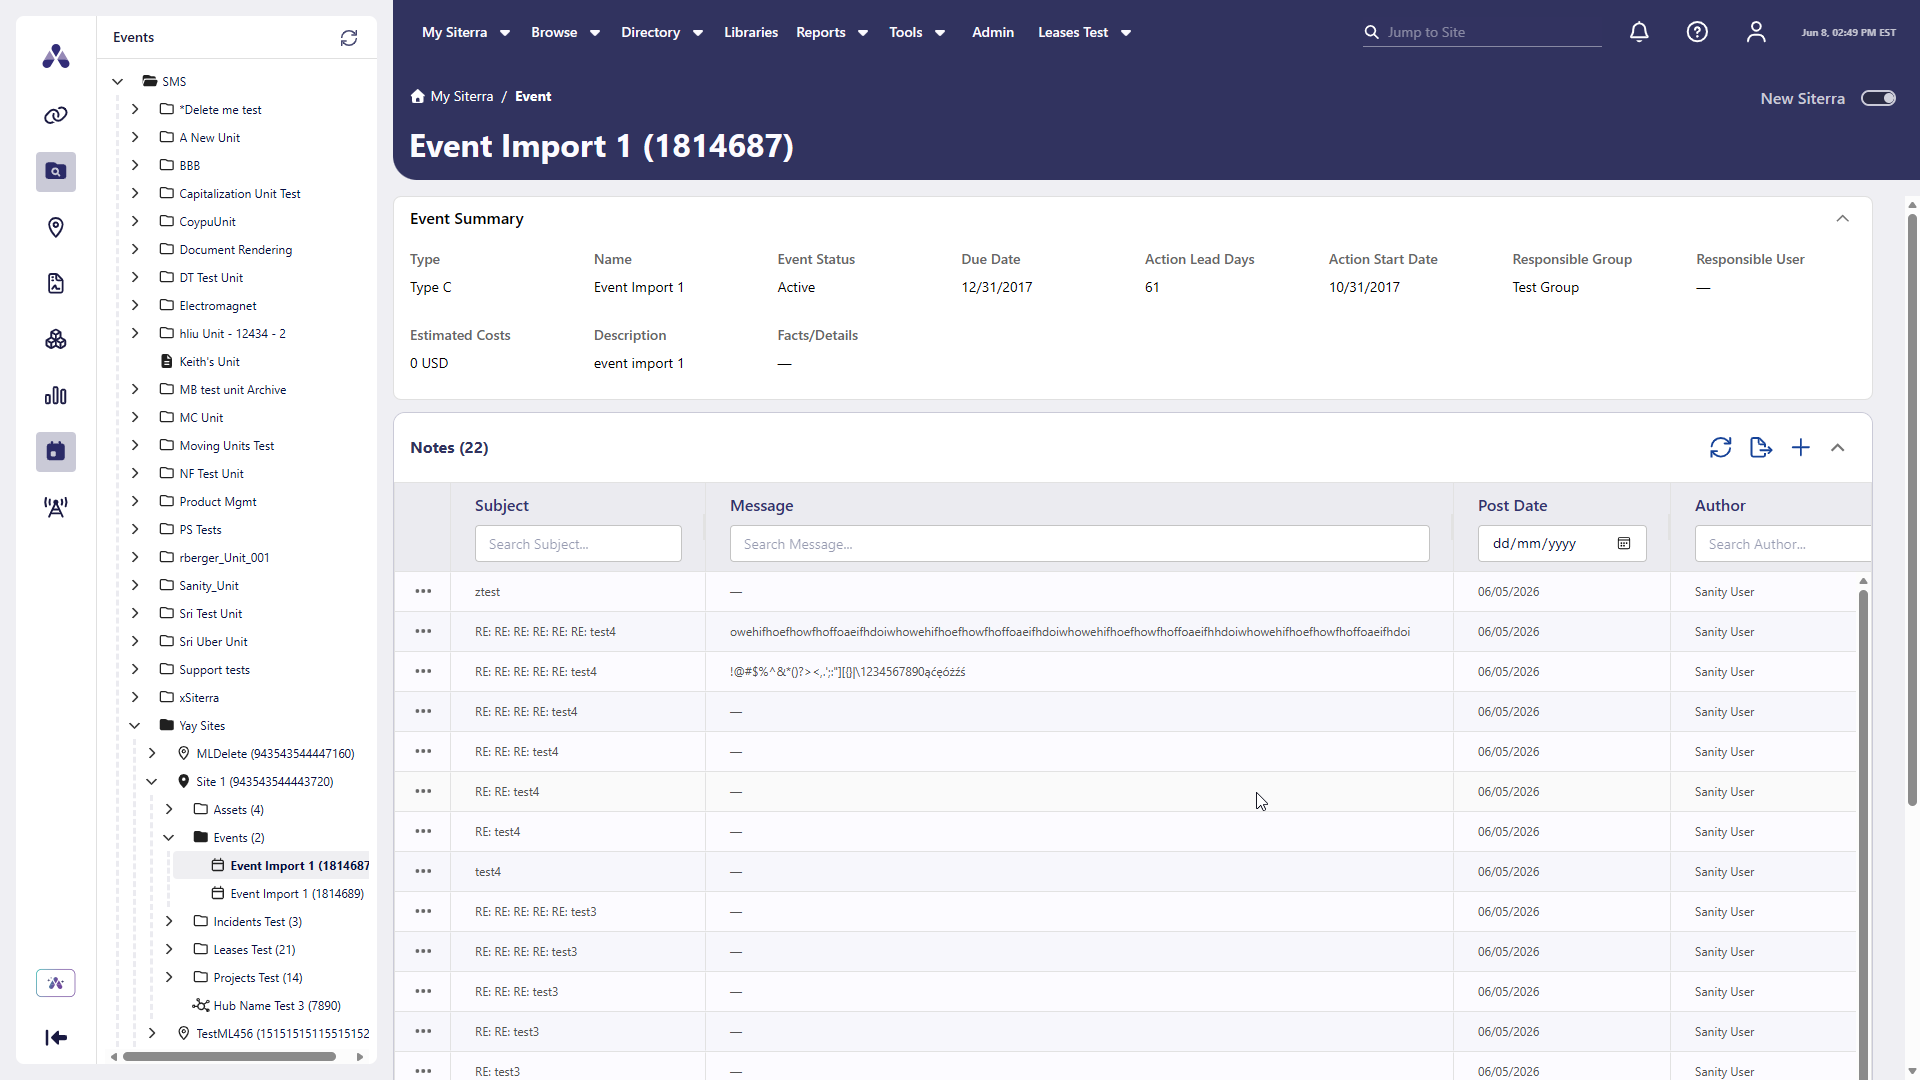
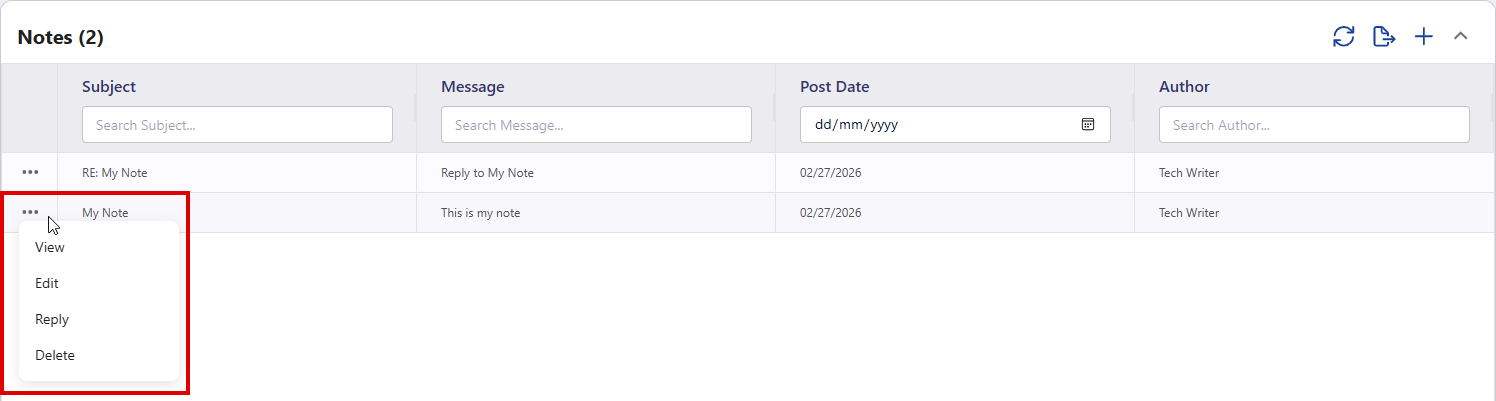
In New Siterra, View, Add, Edit, Reply and Delete notes using the ellipsis () in the Notes section.
Recurring Instances
SP-59916, SP-59917
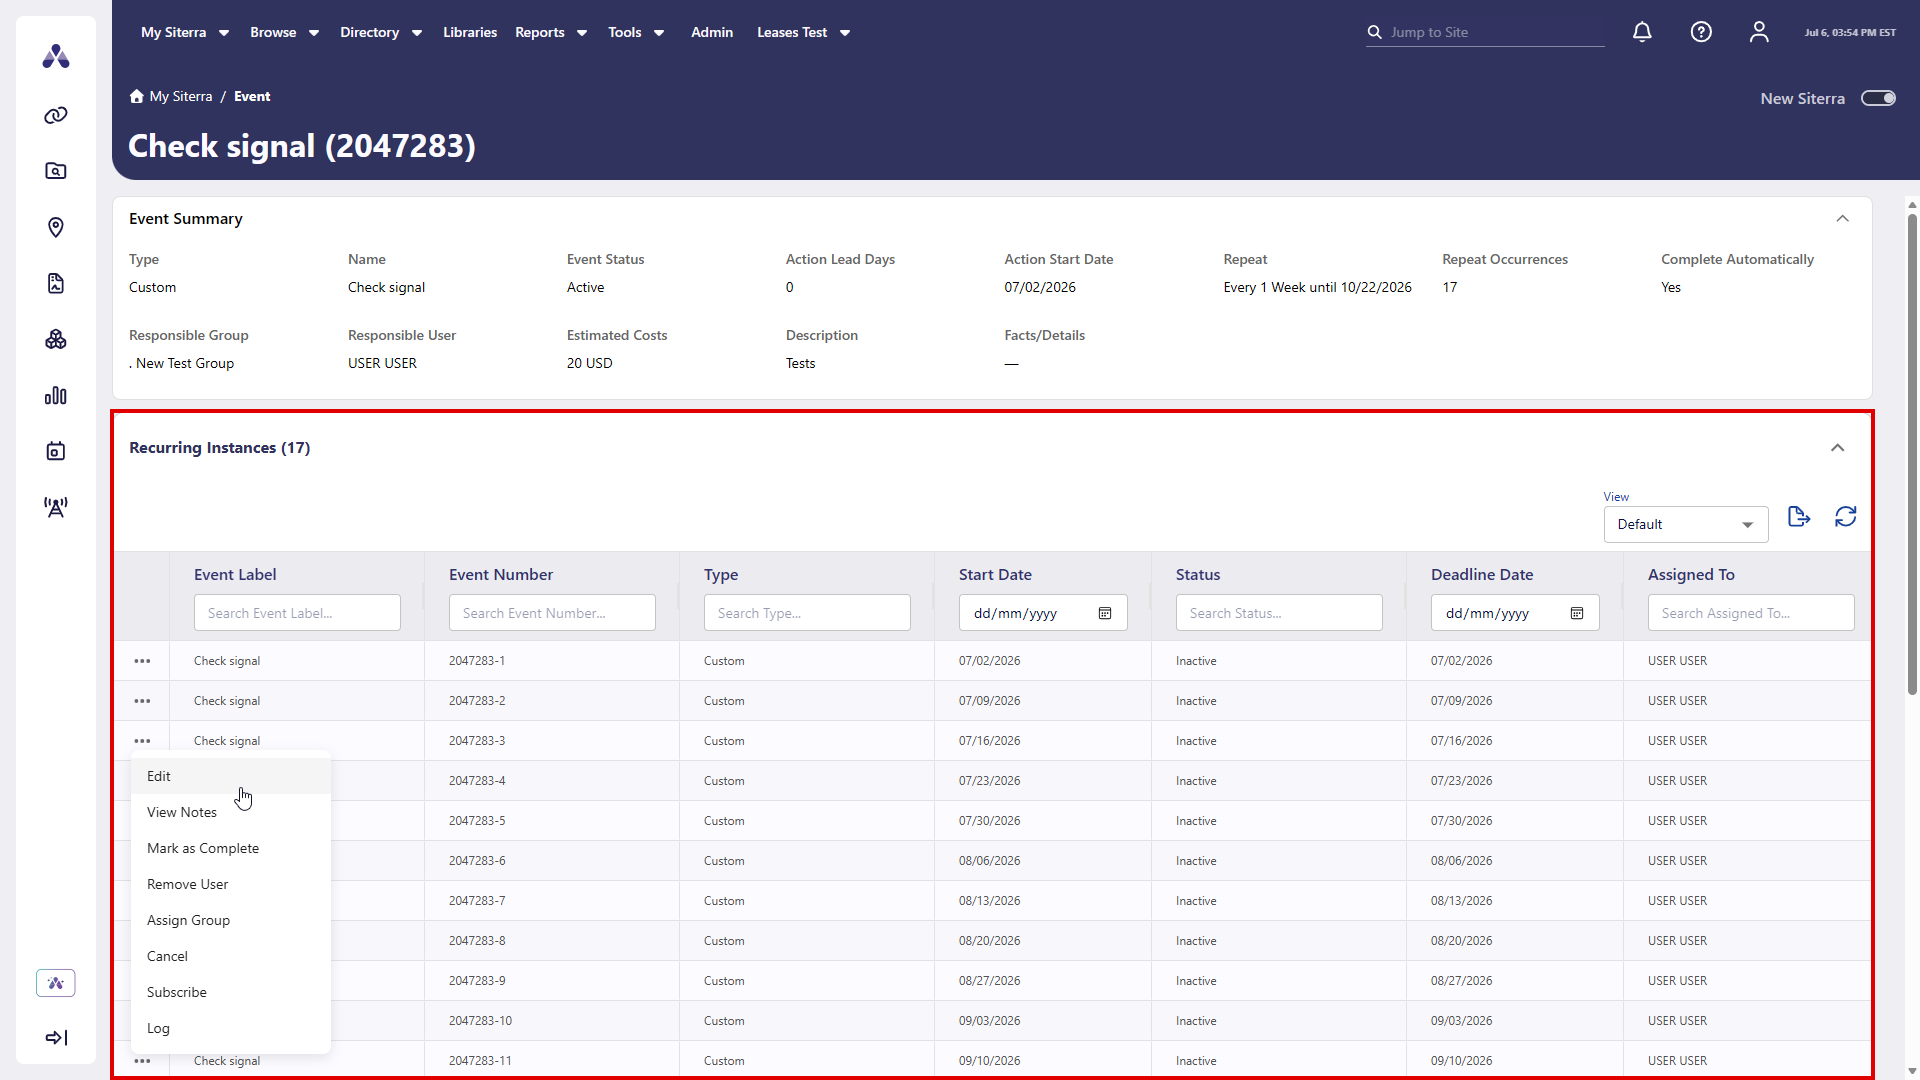
When you open an Event with recurring instances, the Recurring Instances section displays below the Event Summary section with a list of each instance, so you can quickly review and manage recurrence-related records.
If there are no recurring instances for the event, an empty table displays.
Select the ellipsis () next to an instance to take action on it.
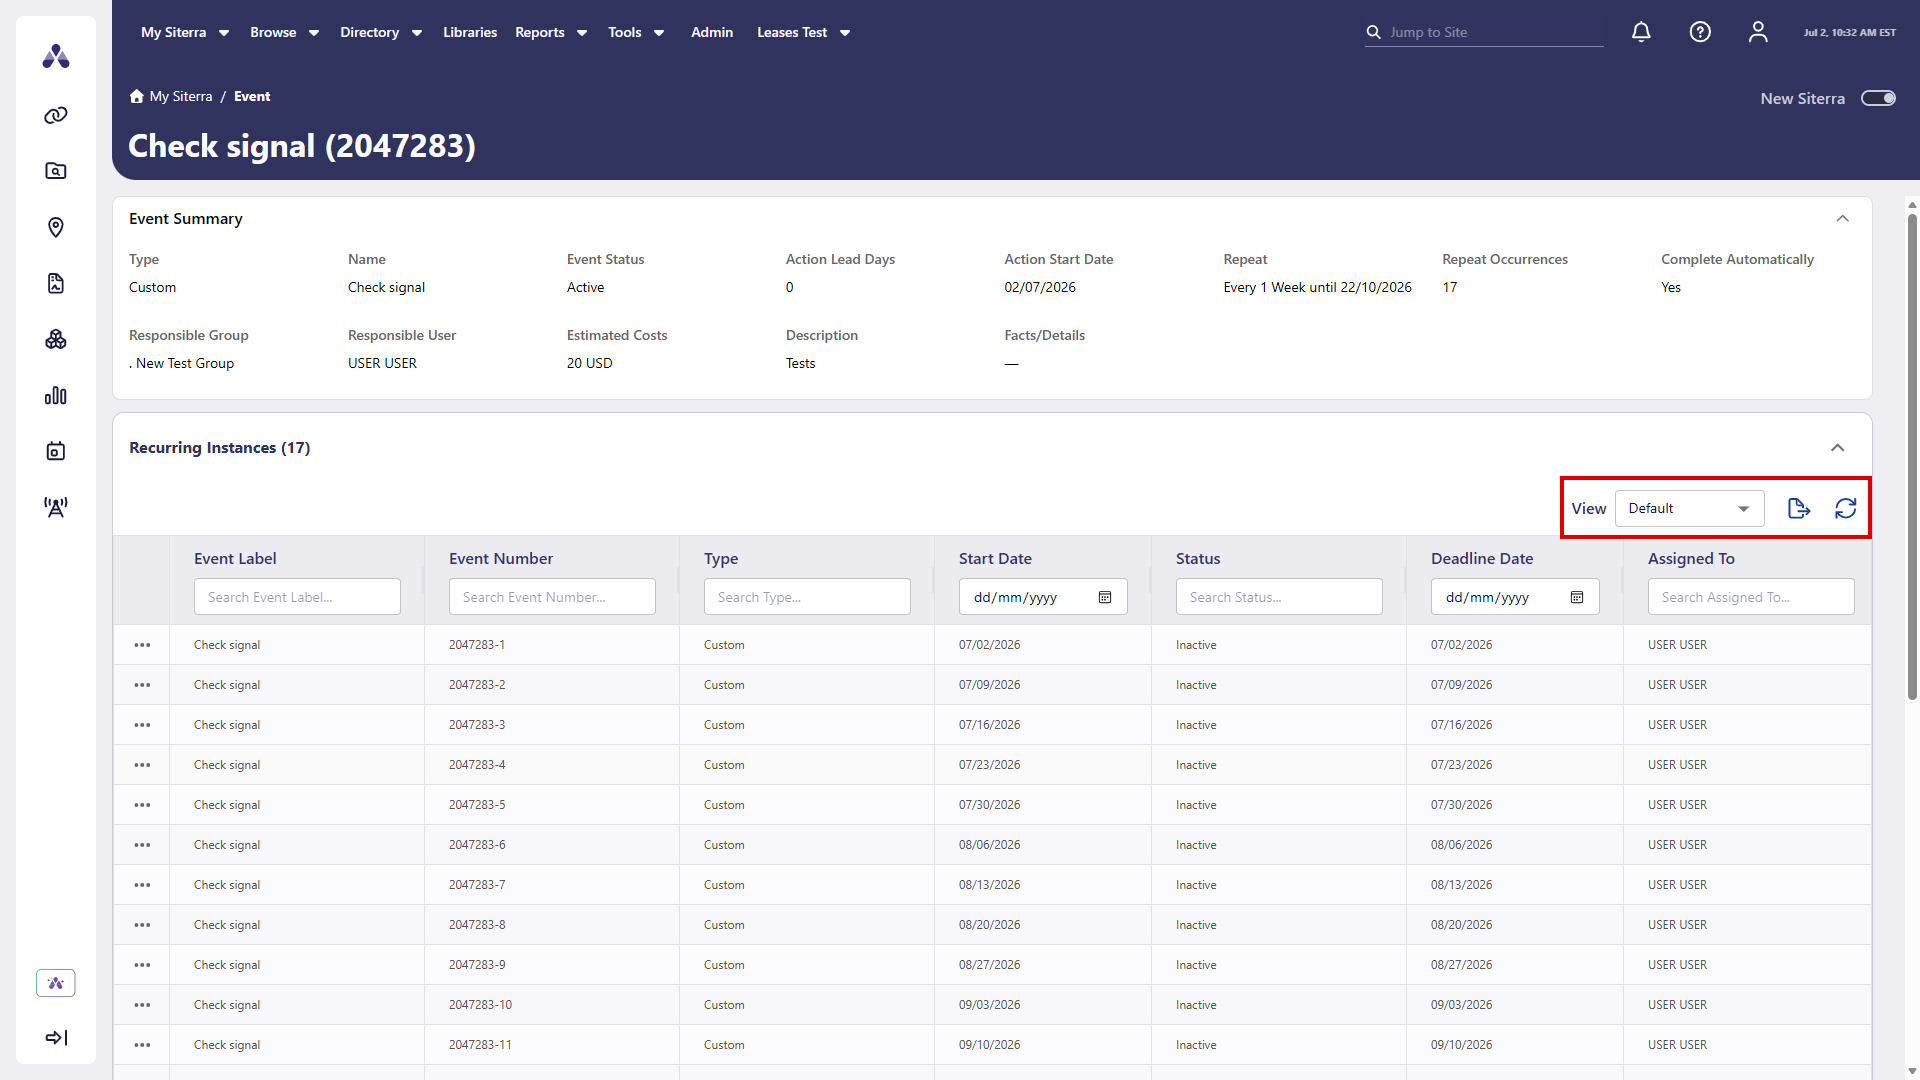
Use the toolbar in the Recurring Instances section to control how data displays and to work with event data more efficiently.
-
Select a View to change the grid layout to a saved view.
-
Select Refresh
 to reload the grid data without refreshing the page.
 -
Select download
to export the grid data.
Incident home page
SP-59754
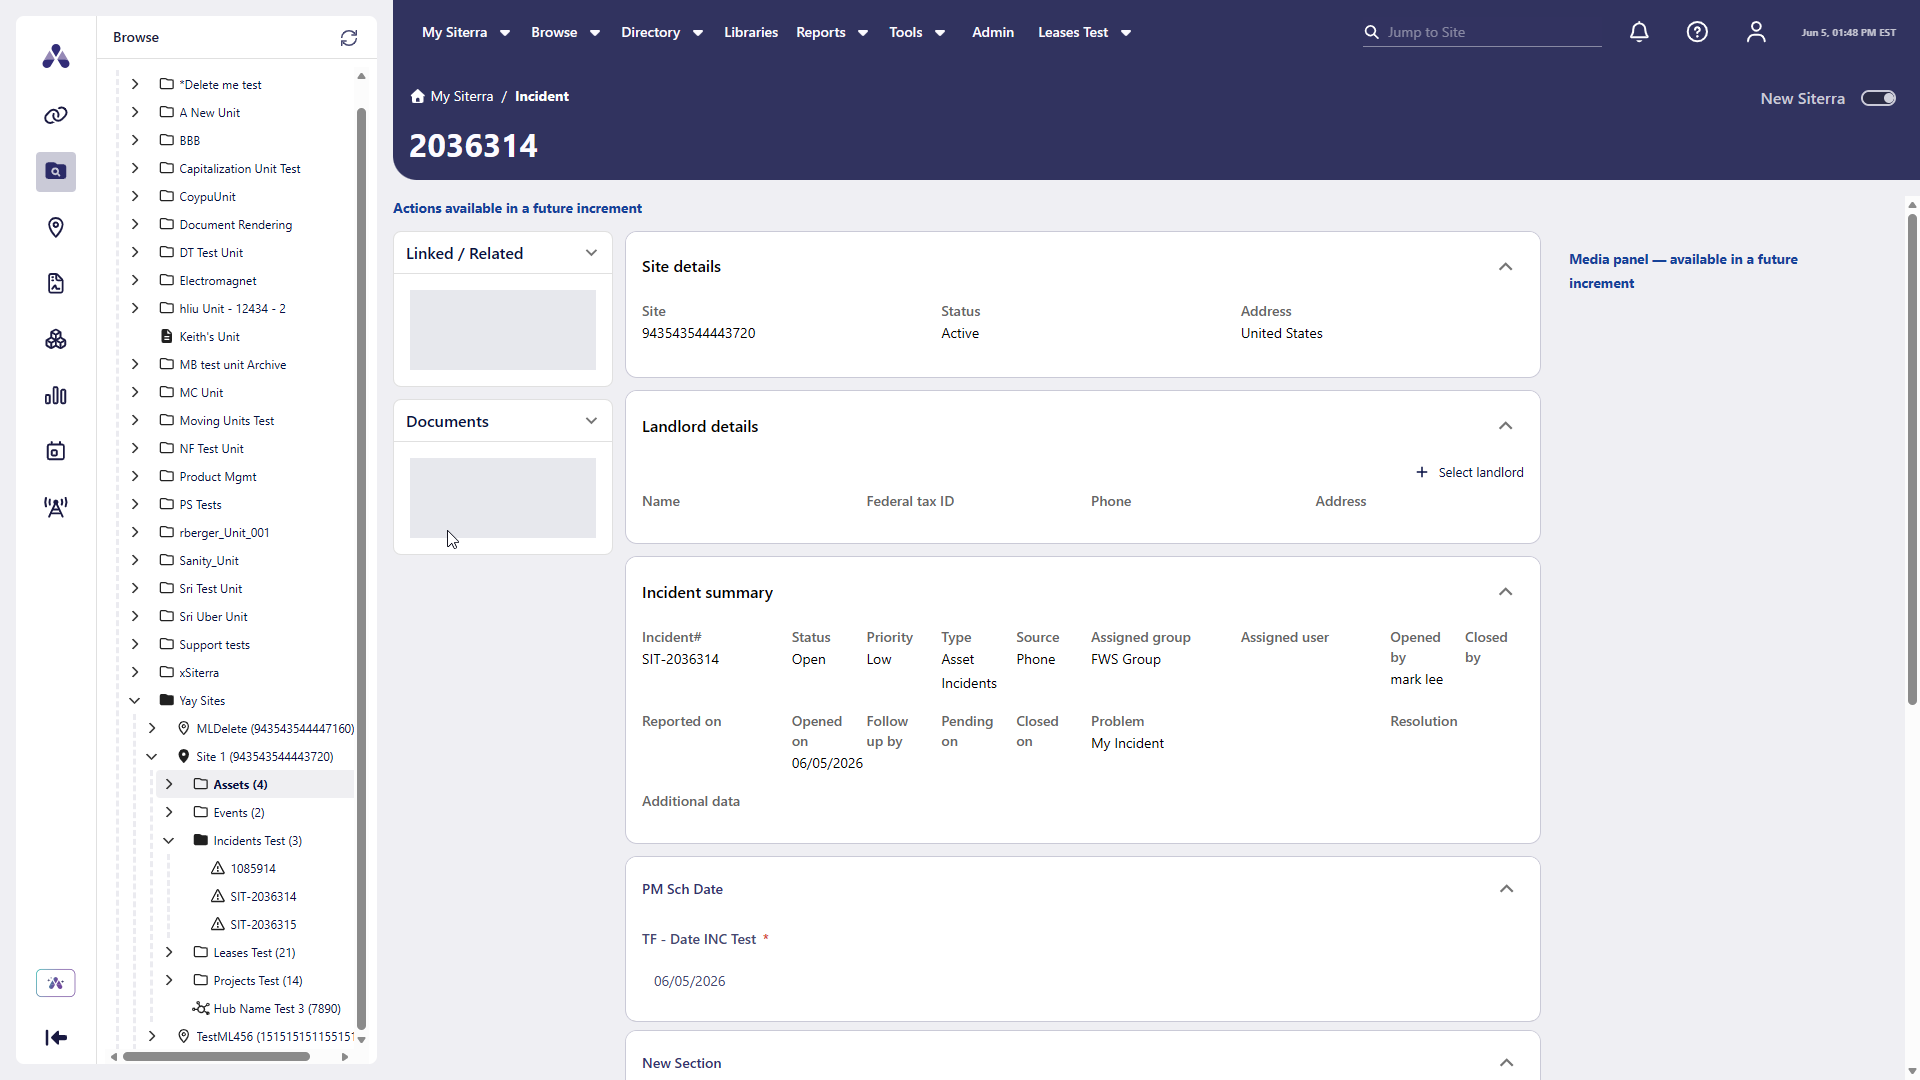
View the details of an incident using the sections of the new Siterra Incident home page:
-
Site details
-
Asset Details
-
Landlord details
-
Incident summary
-
PM Sch Date
-
Contacts
-
Log
-
Notes
Select the down arrow to expand a section and up arrow to collapse it.
View asset details on the Incident page
SP-59776
When you open an incident that was created from an asset, the Incident page now displays an Asset Details section between Site Details and Landlord Details. This shows the Asset, Number, and Type, so you can quickly identify which asset the incident relates to without navigating away from the page.
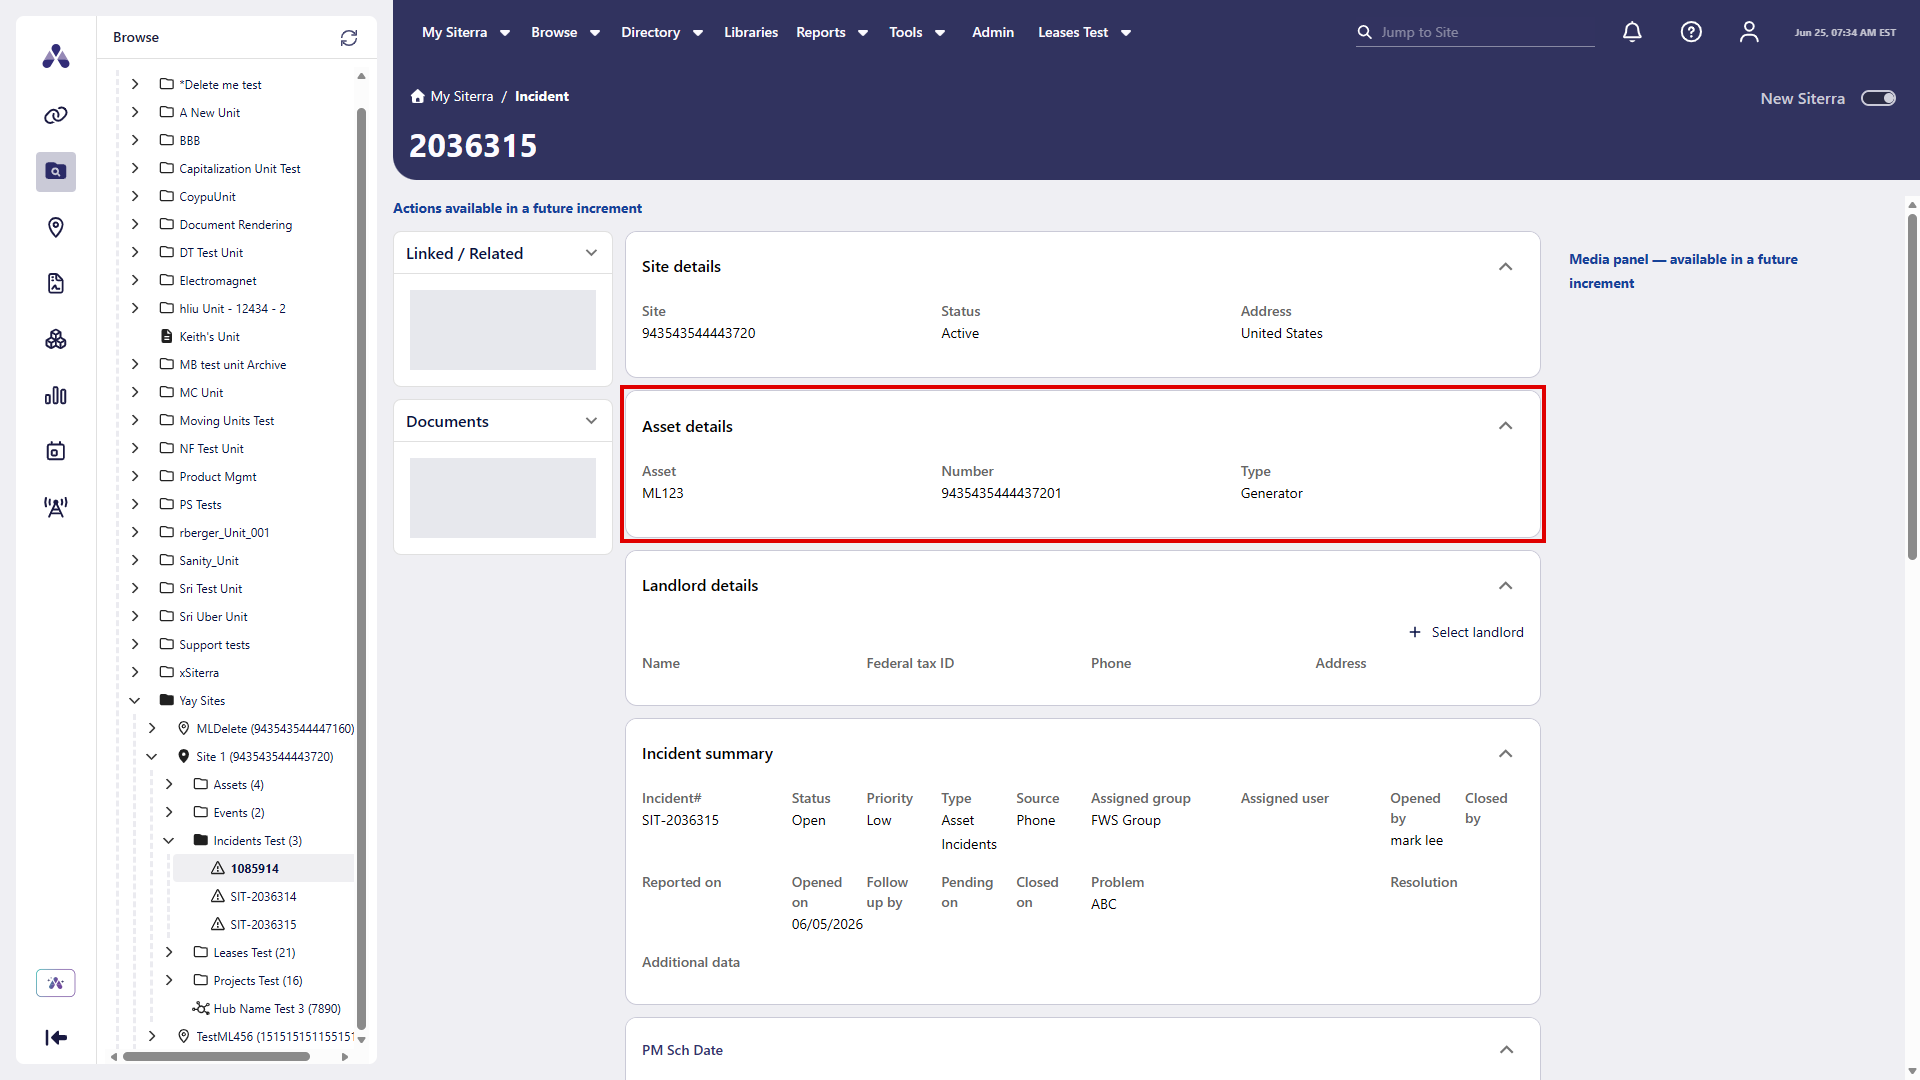
Select anywhere in heading to expand or collapse the section, or select the down arrow to expand and up arrow to collapse it.
If you created the incident from a site, the Asset Details section doesn't display.
Display forms on incidents created from assets
SP-59777
When you open an incident created from an asset, the Incident page displays additional sections based on your Extended Attributes (EA) configuration. This behavior is the same as on the Asset and Project pages.
Each section represents a logical group of Extended Attributes and uses the section name as the title. The fields in each section display the configured EA labels and values.
If no Extended Attributes are configured, no additional sections display.
When an administrator adds a new EA section to the configuration, the new section automatically appears on the Incident page.
If the incident was created from a site, asset-specific EA sections don't display.
View, add, remove, and export incident contacts
SP-59773
View and manage contacts associated with an incident directly from the Incident home page. The Contacts section displays all related contacts in a table, so you can quickly identify who is involved without navigating away from the incident.
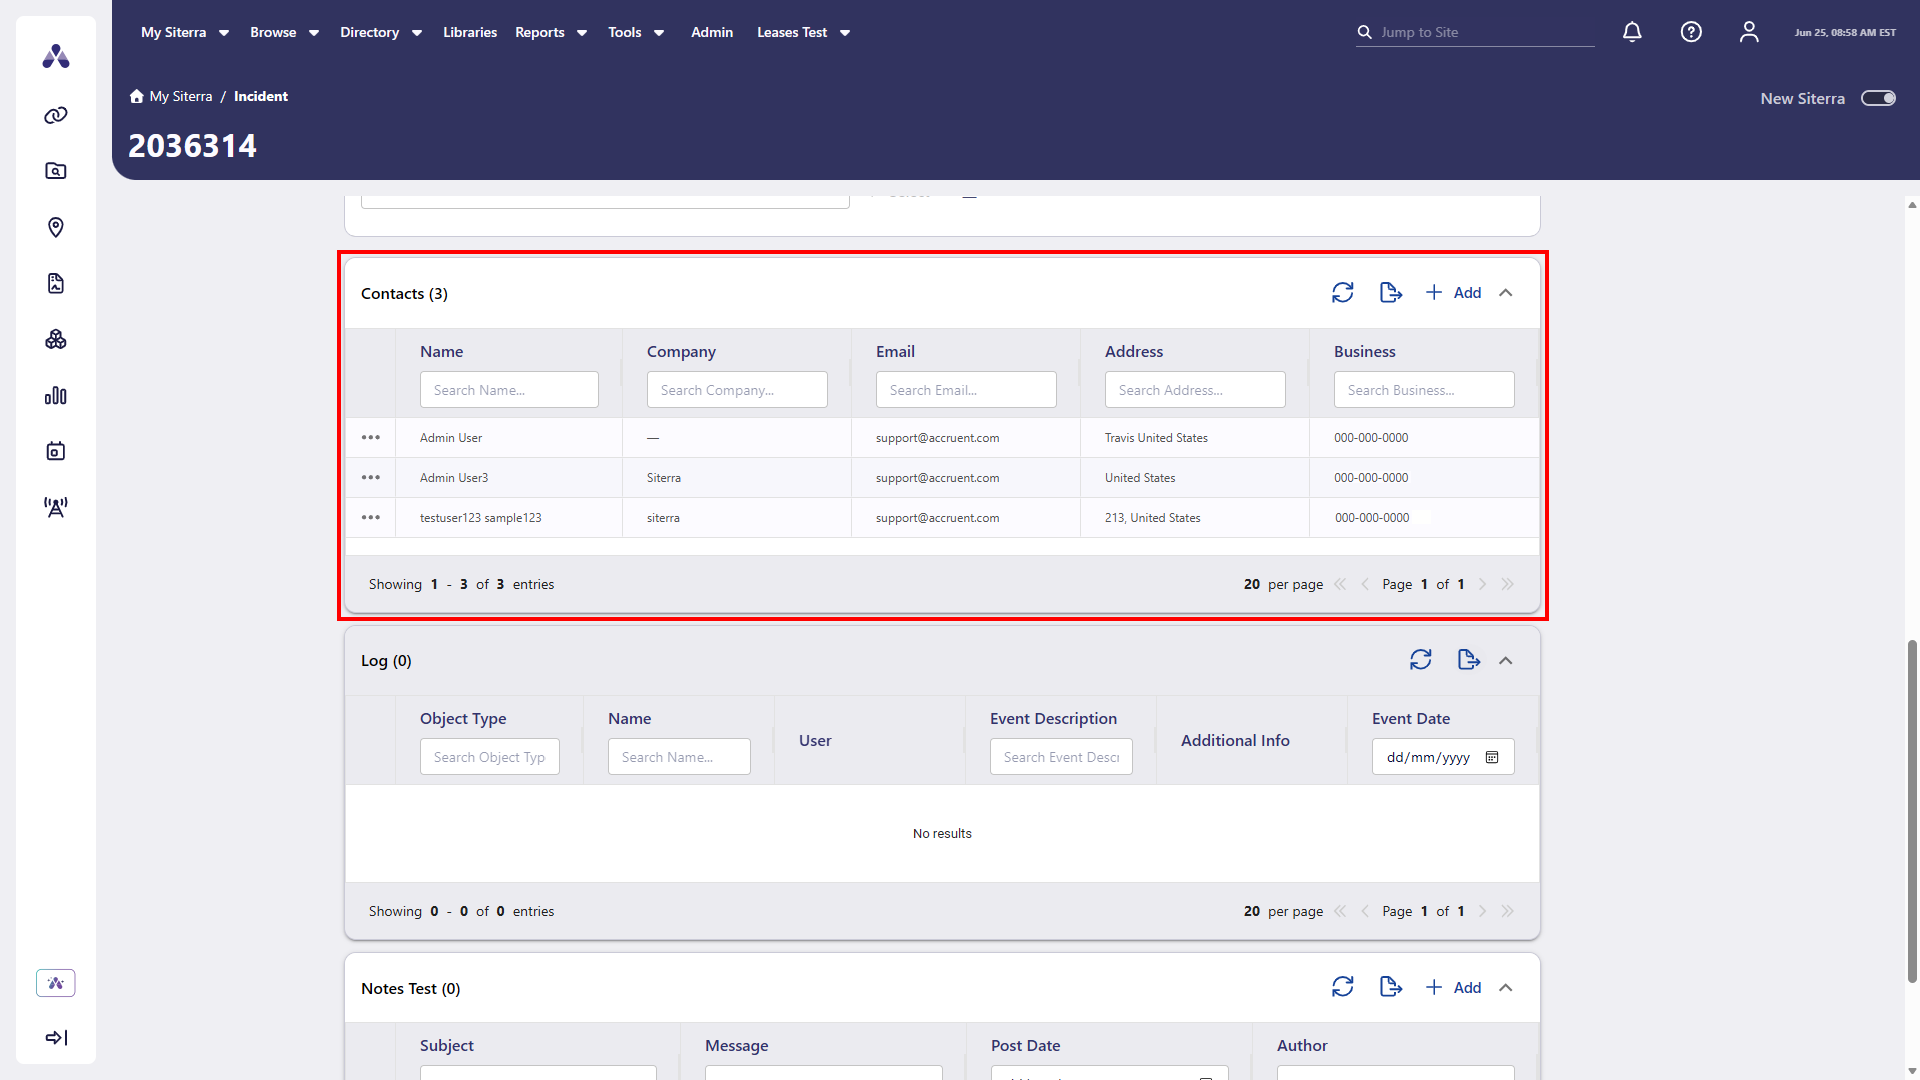
Use paging and sorting to find contacts. Select a column header to sort results in ascending or descending order.
The contacts table refreshes automatically when you navigate between incidents.
Select to add a contact to the incident.
Select download to export contacts to Excel.
To remove a contact, select the ellipsis () next to it, then select Remove.
View incident notes
SP-59775
View notes associated with an incident from the Incident home page. The Notes section displays related notes in a table so you can review incident history and communication without leaving the page.
Use paging and sorting to find notes. Select a column header to sort the results in ascending or descending order.
The notes grid refreshes automatically when you navigate between incidents.
Select a landlord
SP-59850, SP-59851, SP-59852
Select, create, and remove a landlord directly from the Landlord details section of the Incident page using vendor and contact records.
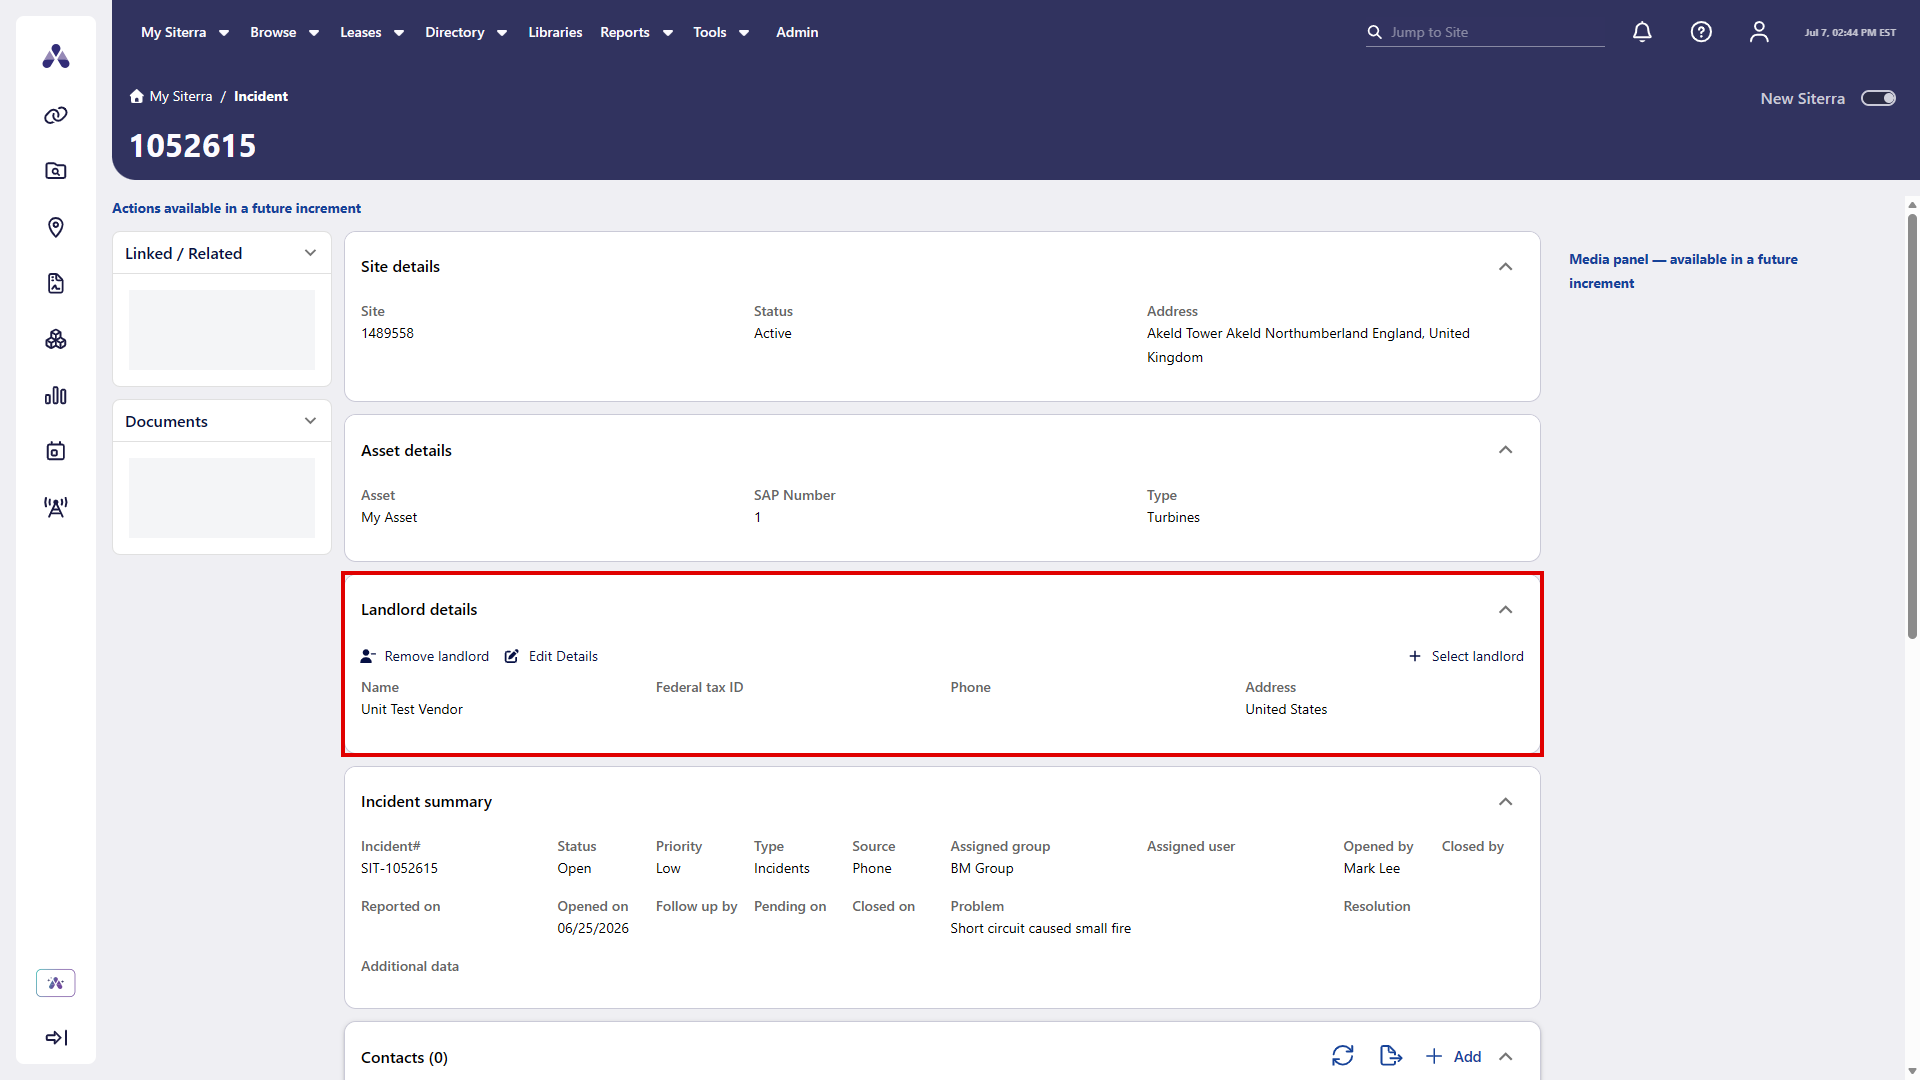
-
Select + Select Landlord in the Landlord Details section.
-
Select a tab to browse and select from existing records:
-
Vendor
-
Contact
Select download
to export the list of records to Excel.Select Refresh
to update the list. -
-
Optionally, create new Vendor or Contact records:
-
Select Create New.
-
Enter the Vendor or Contact information on the form that displays.
-
Select Create Vendor or Create Contact
-
-
Select + Select next to the Vendor or Contact record to associate as the landlord for this incident.
-
Select Edit Details to edit landlord details for this incident.
Select Remove landlord to remove the selected record from the incident.
Project home page
SP-58504
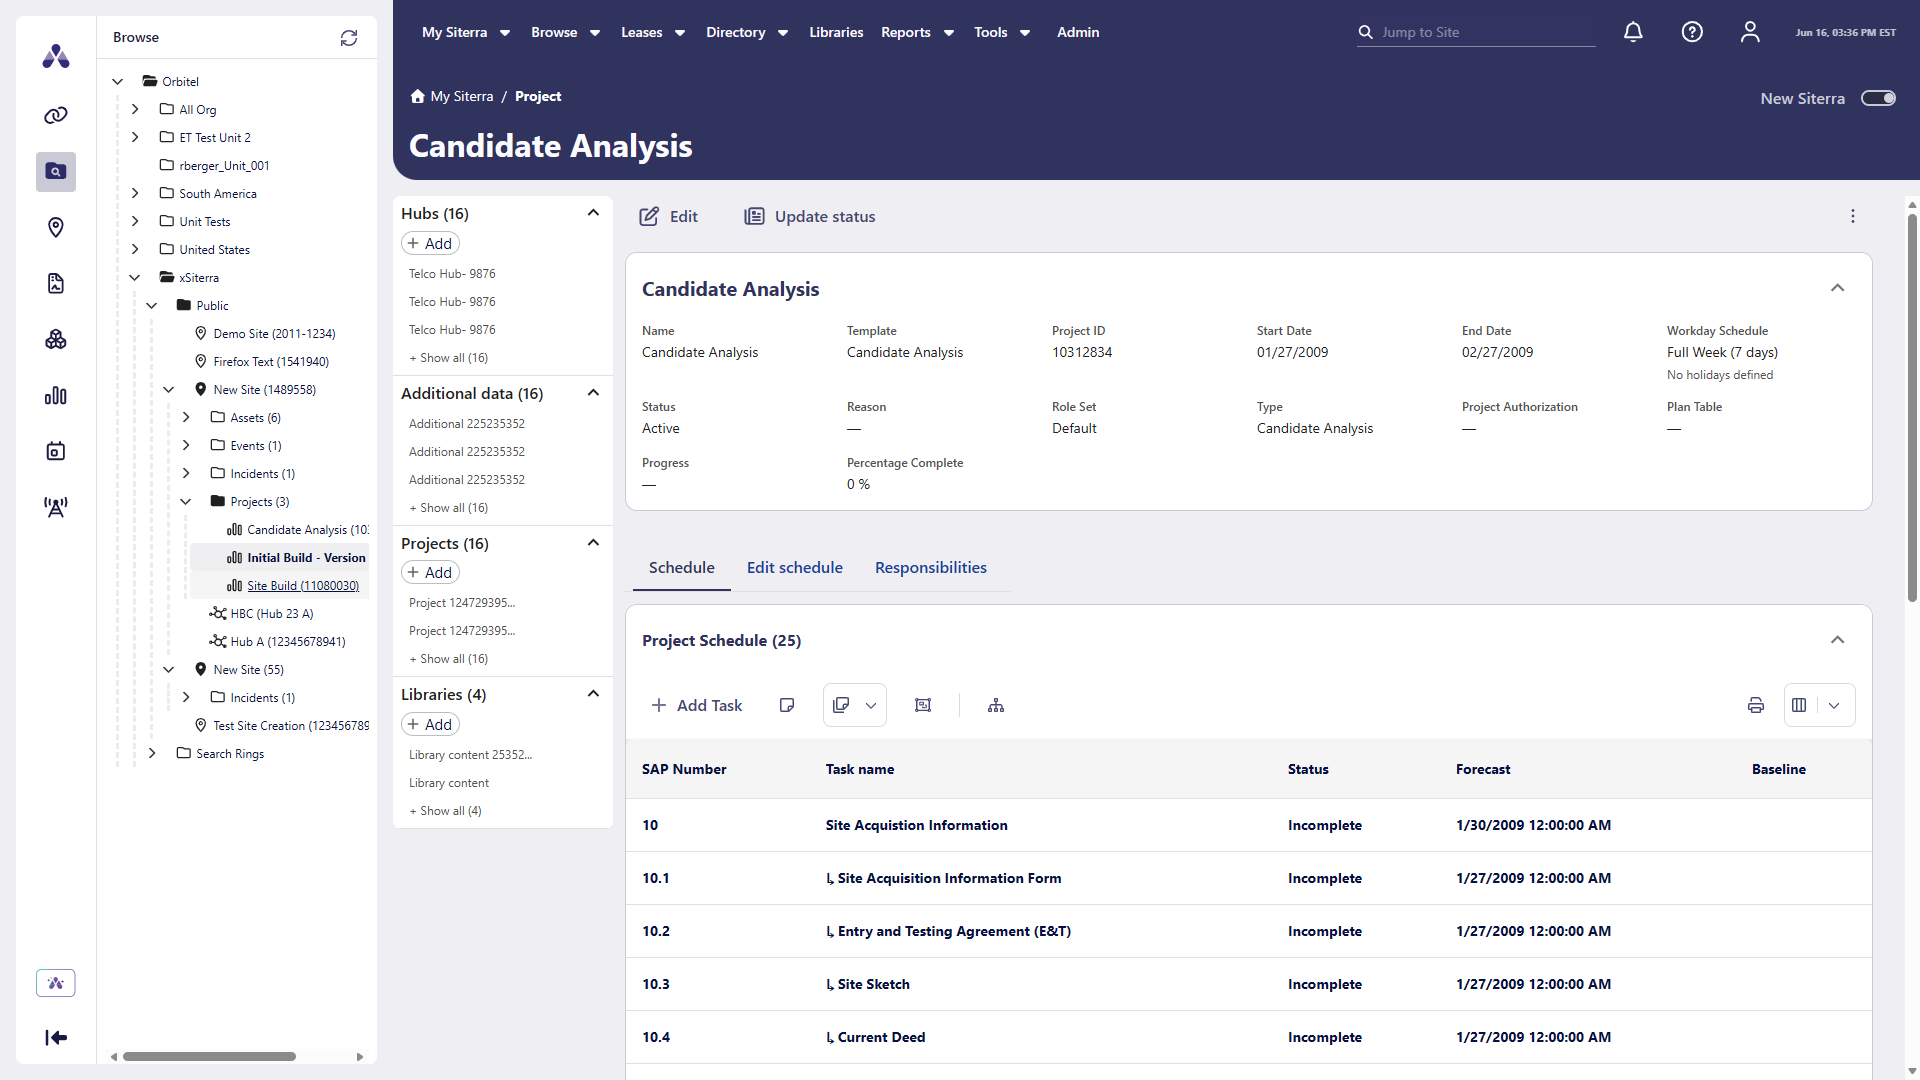
View and navigate projects using the new Siterra Project home page:
-
Top header menu: Access project-level actions from the toolbar at the top of the page.
-
Left navigation tree: Select a project to navigate to it. The current project is highlighted in the tree.
-
Side container: View related information alongside the main project content.
-
Central content area: View page headers and project sections.
Navigate between projects without the page reloading, so you stay focused on your work.
Select the down arrow to expand a section and up arrow to collapse it.
Project information
SP-59727, SP-59728
Project information displays in the section at the top of the Project page, including the project title and core attributes, matching the available data in classic Siterra.
Workday Schedule displays schedule details and holiday information:
-
When holidays are configured in the Workday Schedule, a View Holidays link displays. Select it to view holiday details.
-
When no holidays are defined, a note displays: NOTE: No holidays defined in this Workday Schedule.
Workday Schedules are configured in Admin > Templates > Workday Schedule.
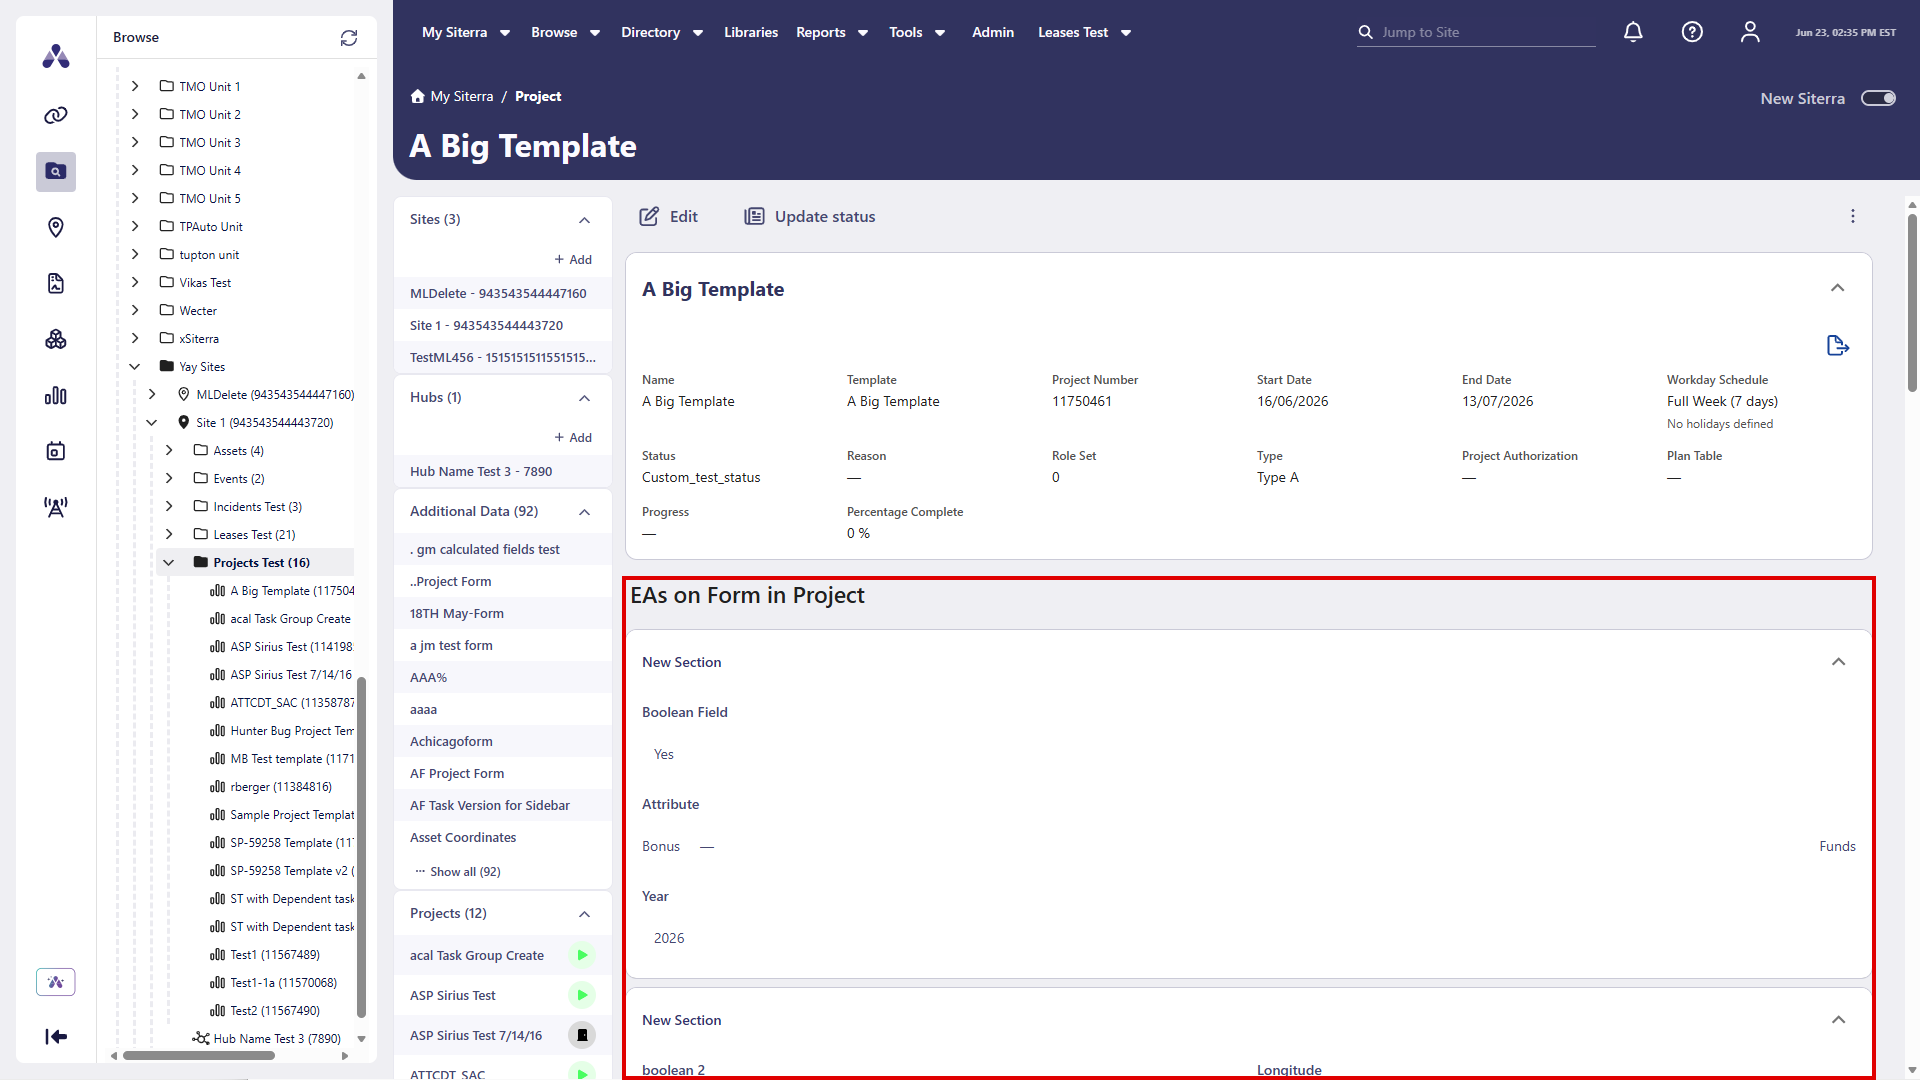
Extended Attributes cards
SP-59729
The Project page dynamically renders additional cards based on your Extended Attributes (EA) configuration, following the same behavior as the Asset page:
-
Additional cards display below the Project Header Card based on your EA configuration.
-
Each card represents a logical grouping of Extended Attributes with the section name as the card title.
-
Fields inside each card display EA labels and values.
-
If no Extended Attributes are configured for the project, no additional cards display.
Top menu actions
SP-59899, SP-59909, SP-60043
Actions available from the top menu.
|
Icon / Option |
Function |
|---|---|
|
|
Edit project information including Name, Number, Start Date, End Date, Workday Schedule, and Status. The Edit Project dialog is preview only in this release. Changes won't be saved. |

Select a Role Set
SP-59952
Select a Role Set when you create or edit a project. The Role Set option lists the available role sets for the selected schedule template.
Role Set is required. You must select a role set to create a project. When you edit an existing project, the Role Set option displays the saved value.
The available role sets update automatically when you change the schedule template.
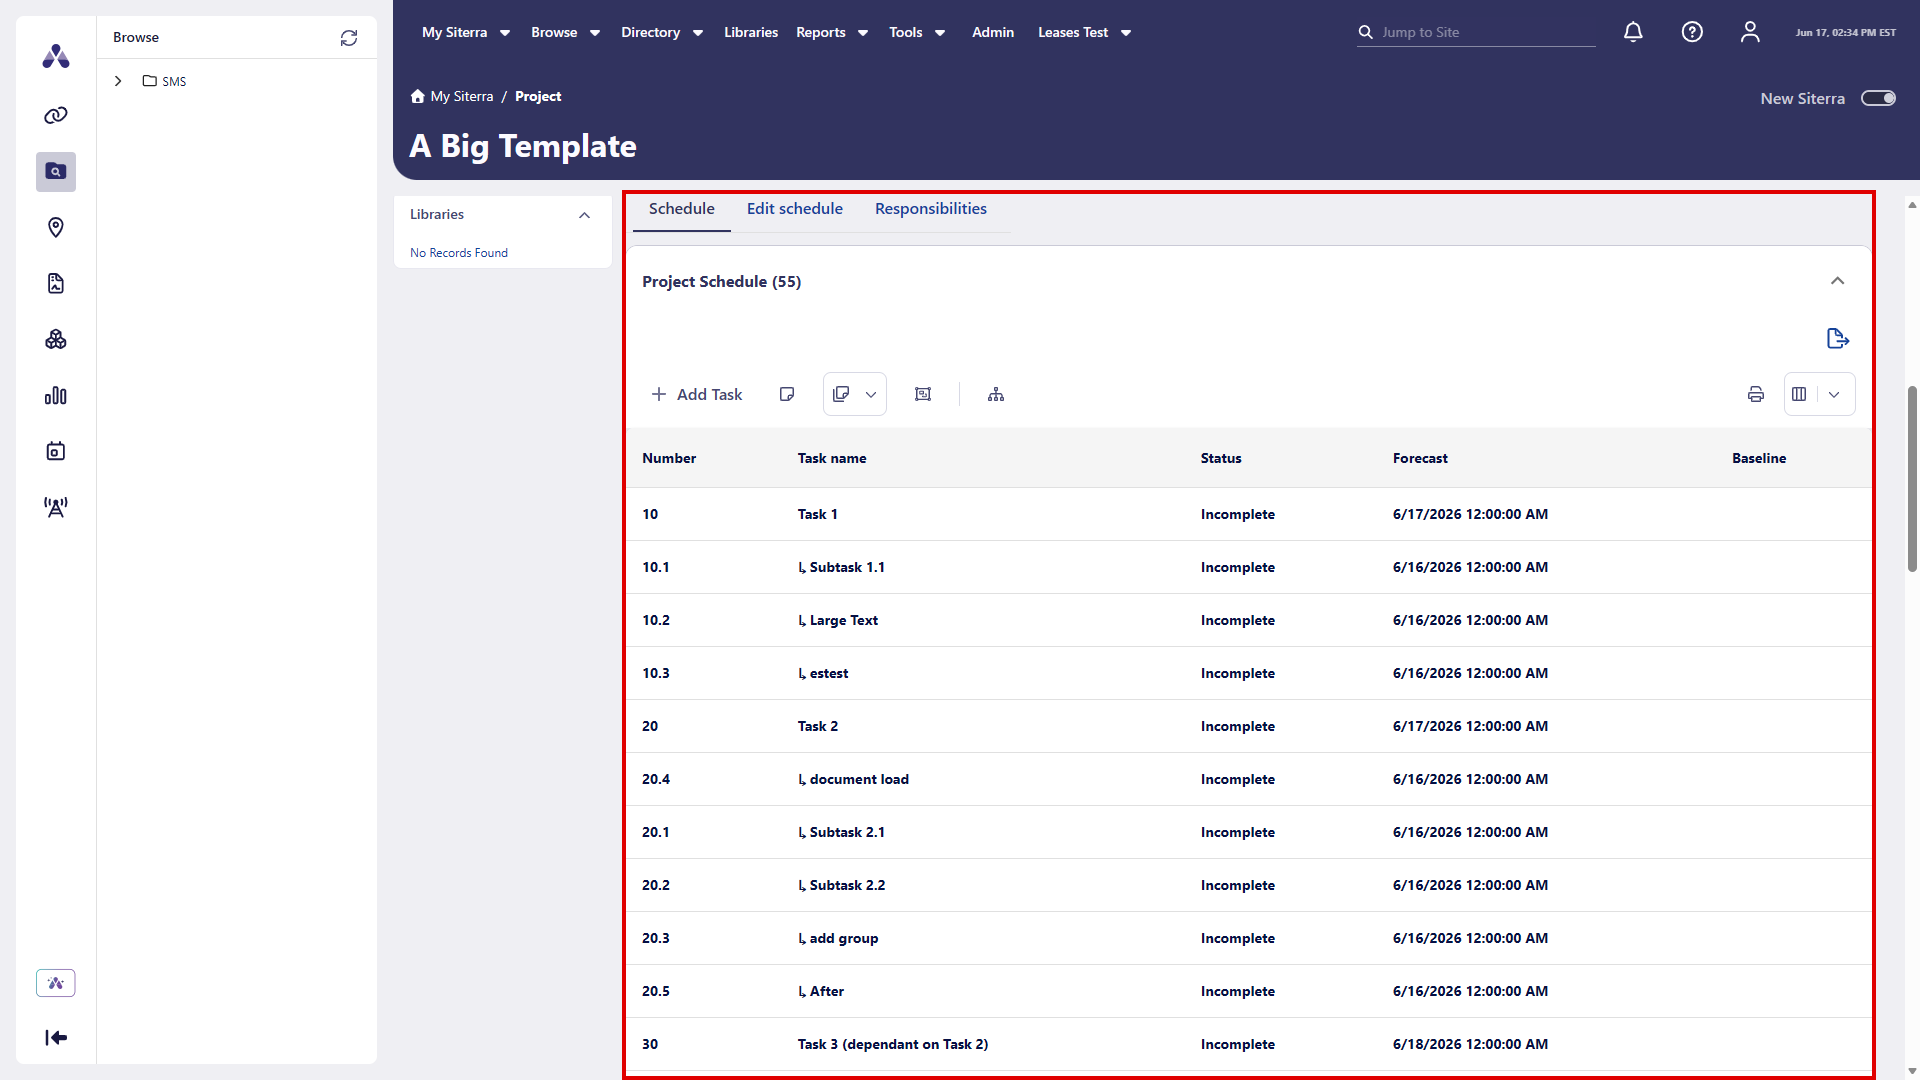
View tasks
SP-59731, SP-59730
View tasks in the Schedule tab.
Assign, reassign, and remove role assignments in the Responsibilities section
SP-59837
Manage role assignments in the Responsibilities section of the Project home page with a streamlined, context-aware experience.
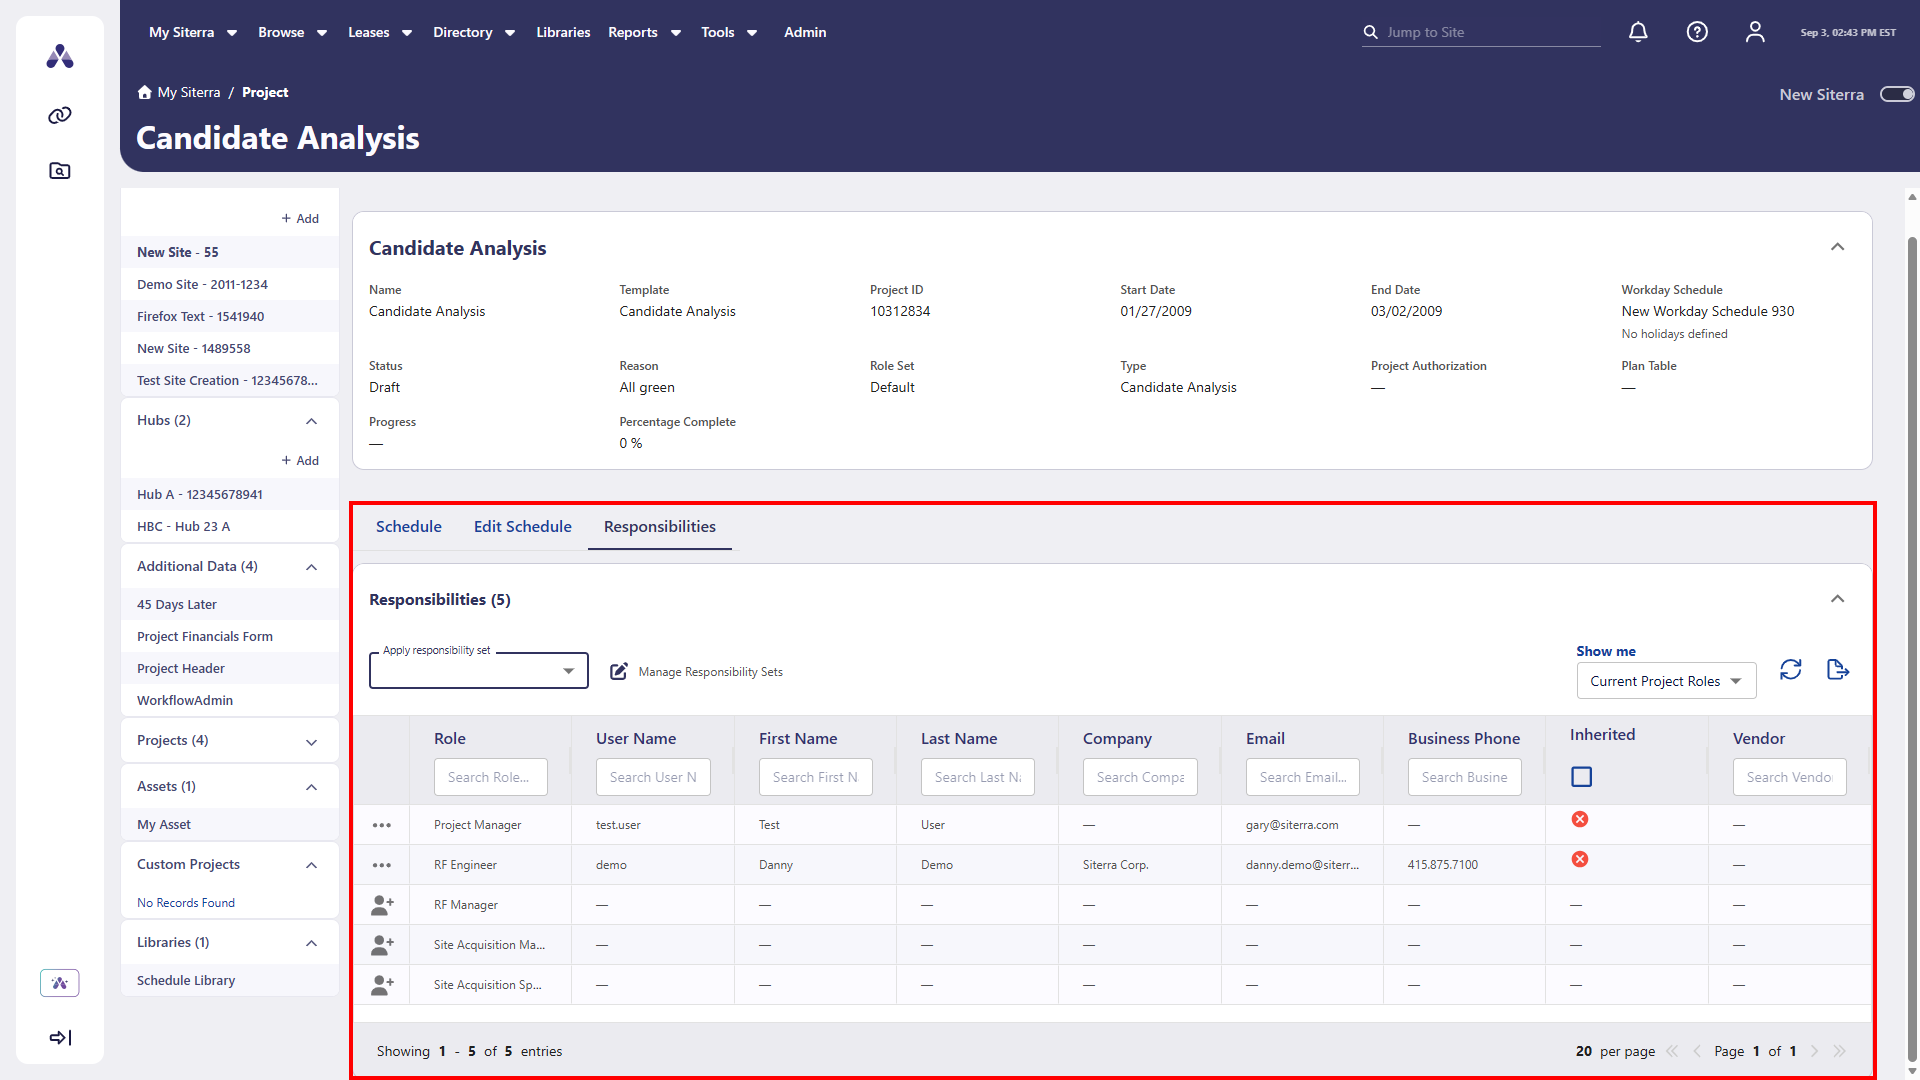
Roles with no assigned user are indicated with a person with plus icon  .
.
Roles assigned to a user are indicated by the ellipsis ().
To assign a user to a role, select the person with plus icon in the role to assign, then in the Select User dialog, select + Select next to the user.
To reassign a role to another user, select the ellipsis () > Reassign, then in the Select User dialog, select + Select next to the user.
To remove an assignment, select the ellipsis () next to that role, then select Remove Assignment.
Filter responsibilities
SP-59839
Filter and sort responsibilities using:
-
Show me: Select an option to display Current Project Roles or All Project Roles.
-
Column headings
Select Refresh to update the list.
Apply a responsibility set
SP-59838
Assign responsibilities once, save the assignments, and then reuse them on any project.
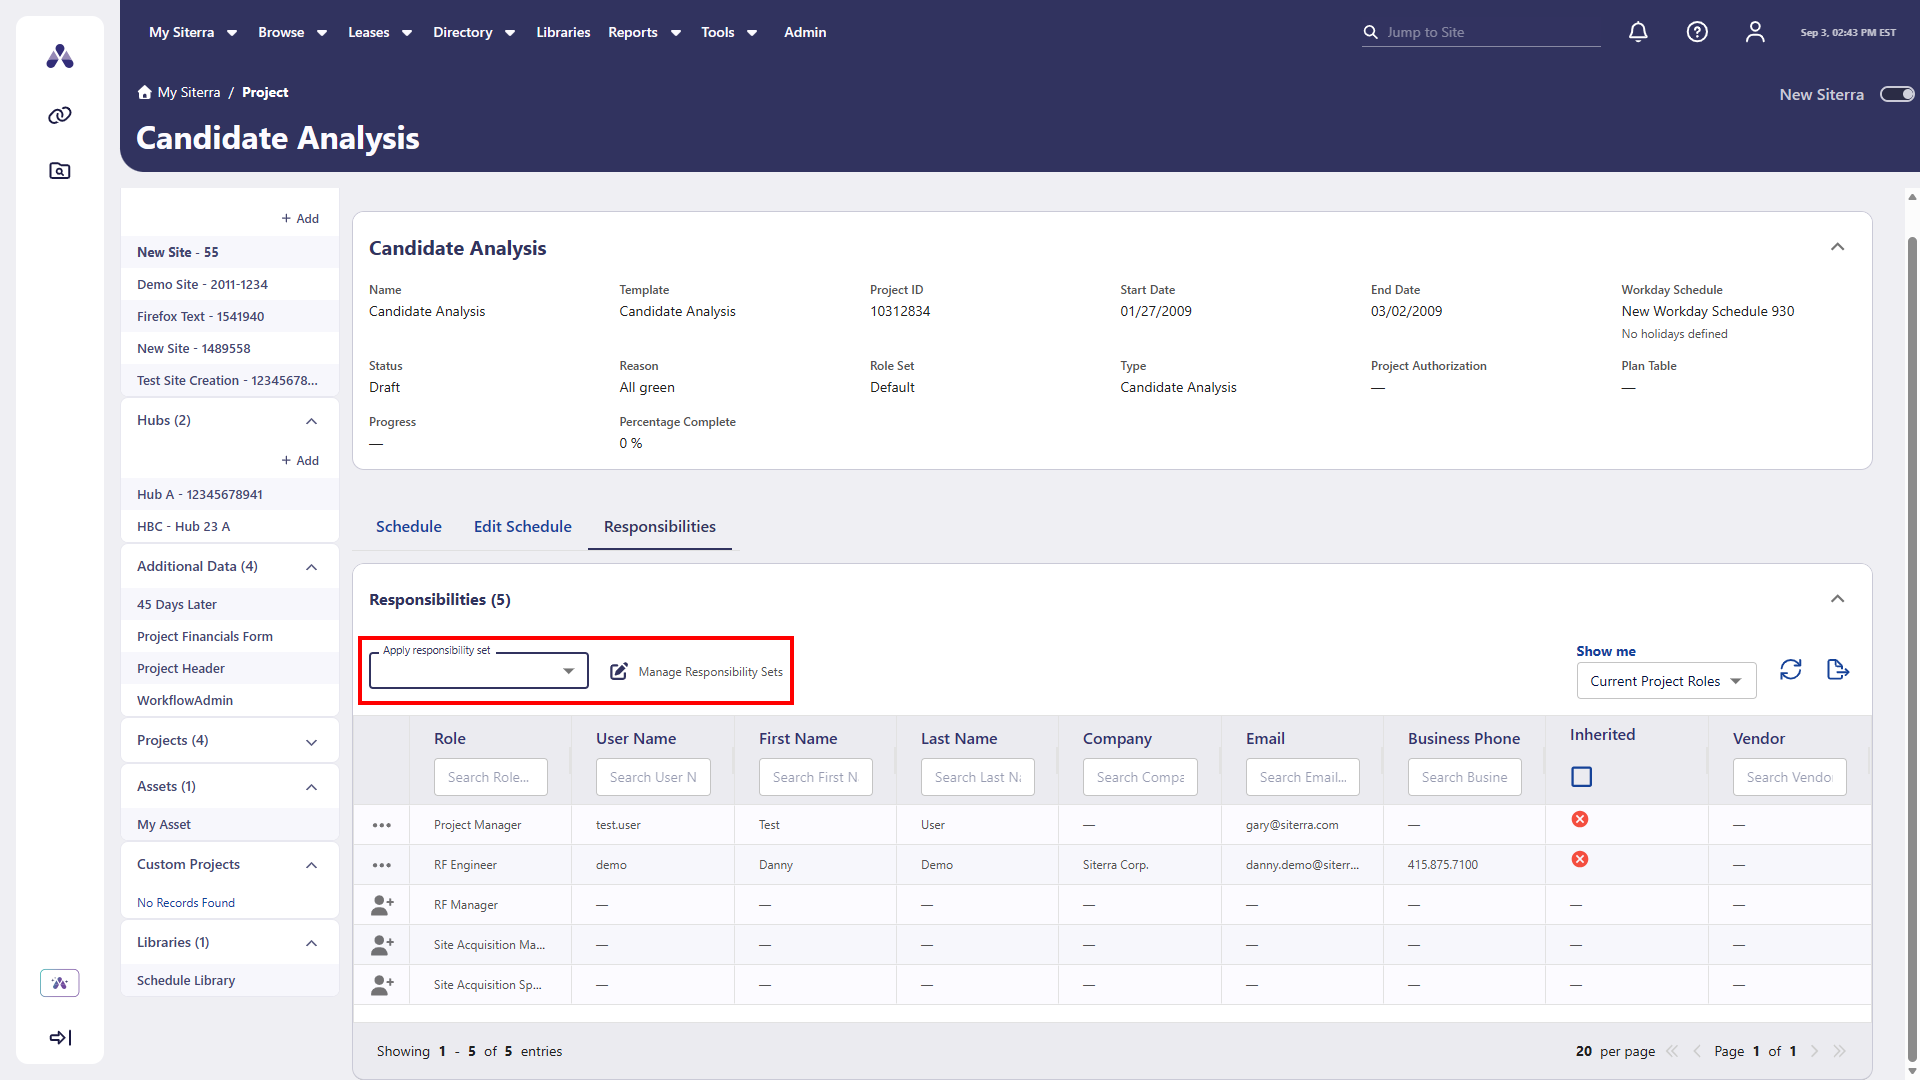
-
Select Manage Responsibility Sets on the Responsibilities tab of the Project page.
-
On the Manage Responsibility Sets page, assign users to all available roles and save the assignments as a set.
-
Select Return to Project.
-
In Apply responsibility set, select the responsibility set to apply, then select Apply in the confirmation dialog that opens.
This overrides any existing role assignments.
Display forms
SP-59729
Display forms with extended attributes as cards and additional sections on the Project home page.
Search ring home page
SP-59939
View and navigate search rings using the new Siterra Search Ring home page:
-
Header and title area with breadcrumb navigation
-
Top menu bar
-
Left-side panel
-
Main content region for cards and grids
View these sections:
-
Search Ring Data
-
Forms with Extended Attributes
-
Responsibilities
-
Projects Summary
-
Notes
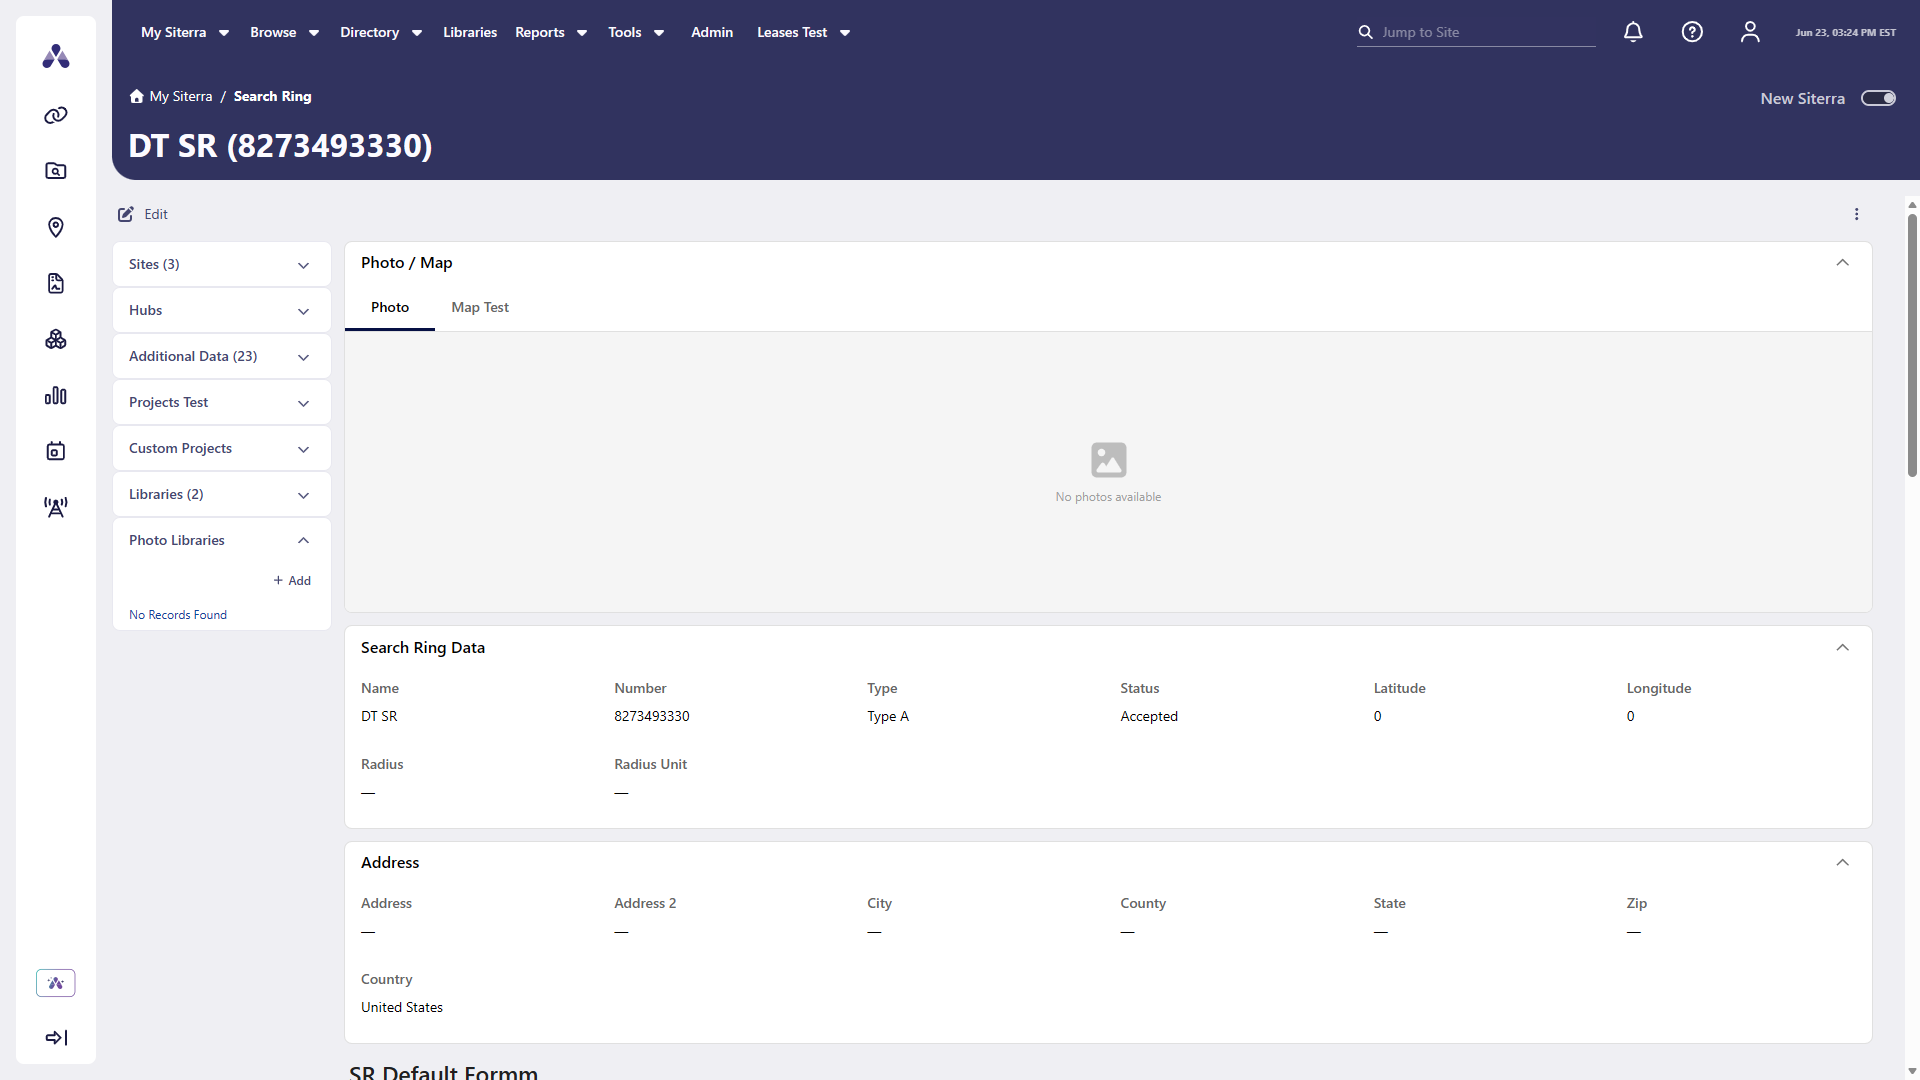
Select the down arrow to expand a section and up arrow to collapse it.
Select download in the toolbar of a section to export items to Excel.
Use the sections in the sidebar to view and add related records directly from the Site home page including:
-
Sites: Access other sites in the parent search ring (or other unit)
-
Hubs: Manage hub objects associated with the site for portfolios with Small Cell functionality enabled.
-
Additional data: View and additional custom forms (not marked as default) associated with the site.
-
Projects: View and create projects associated with the site using templates.
-
Custom projects: View and create Ad hoc Projects associated with the site.
-
Libraries: View libraries associated with the site and add them.
-
Photo libraries: View and add visual resources associated with the site.
Expand and collapse sections to keep your workspace organized.
-
Select +Add to add a new item.
-
Select an item to view it.
Improvements and issues fixed
|
Component |
Summary |
Reference # |
|---|---|---|
|
Asset page |
When you navigate between asset pages, the Photo tab now correctly displays as the default view. |
SP-59763 |
| Sites page |
The Assets section now correctly displays asset records regardless of whether the Assets section is pinned open or closed. |
SP-59882 |